Start 8.12.2015 - a new idea…
The fire fighters are still only existing as a prototype of the sketch. I didn’t did the hardware setup up to now for a prototype. I don’t know why, but instead of starting with this one, I thought about a new cache yesterday. I started with thinking about all the sensors I’m owning. And after quite a short time I came up with the „Dancing Cacher“.
That’s the main principle of the cache:
- The cacher will have to power it on by batteries he’ll have with him (this will be a must for all our joint smart caches…)
- After some welcome screens on a LCD he will have to move away or move towards the chache in a straight line. For that 16 distances are defined between 20 cm (0,5 feet) and 3 m (10 feet).
- By a tone (high or low) and by a LED (red or green) the cacher is guided to move away or towards the cache.
- When the distance is right, LEDs will flash and some tone will play and the cacher has to move to the next step.
I would like to watch, when the cacher is „dancing“. Maybe, Tim, this is another one for inside the visitors center and we could take a movie by an automatic web cam? An idea only…
Update 9.12.2015 - sketch ready
The sketch is ready. I hope I’ll find some time during next weekend to built the hardware prototype
Update 13.12.2015 - Working with Servo!
On Thursday, 10th I’ve shown the prototype to you, Tim. You’ve been amazed, really. That’s not a real surprise, because the idea is a joke and the sound of the buzzer more than awful. When my wife looked into my office on Wednesday, she asked me, if she need to call the doctor…
During the weekend you asked me, if it would possible not to show a code at the end but to open a drawer as with your SCBC-01 cache. I had already some motors in my local stock, but up to now I never worked with them. So that was the kick into my ash I needed, and I started.
First I looked into your sketch and discovered that including a motor is easy as to include a LED. This is what must be done:
- Include the „Servo.h" library
- initialize the signal pin of the servo
- initialize the servo
- Send the angle, the servo should move to, by a simple command e.g. „my servo.write(90)“ to turn it 90°
That’s all! Usually the servos can turn between -90° and +90°.
Soon I updated the sketch and made a short video (replaced by a new one below):
But I also discovered that the motors I bought already are much more complicated as the one in the starter kit. The ones I’ve bought have a separate break out bourd with 7 connectors. (Hope I’ll sometimes understand, how they’re working…). The one from the starter kit has 3 connectors. Quite easy: 1 for power, 1 for ground and the third one for the signal.
Just ordered some similar ones from Amazon, which should arrive next Tuesday… So I’ll be prepared for the time „between the years“…
In the meantime I understood the different kinds of motors and I’m explaining what I've learned here.
Update 15.12.2015 - Great prototype of the housing & „joint ideas"
During the weekend we talked about making this cache also motorized. I came up with an idea to move up the cache and to make it pickable for the cacher from the top of the housing. On the one hand you liked the idea, because instead of springs, gravity would do the job. On the other hand you didn’t liked the idea, the cache comming out at the top. You said, at the bottom would be much better. To be honest, I didn’t fetched exactly your idea.
Now you sent me the video and everything is clear for me now. A great job done by you. But another thing: We’re not only working on joint caches, also our ideas are joining already!
Update 19.12.2015 - New LCD and about a „double mistake"
Just prior a kidney stone started to suffer you, you told me, that with you the LCD was fine, but no measurements are happening. On my side there was roughly one measurement per second. Some new LCD displays arrived in my „local stock“ and so I rewired the LCD. As ever I made a mistake and it took some time up to the LCD was running. But now there were also no measurements on my side. I checked the wiring about 1000 times and than I started to check the sketch (the program) step by step.
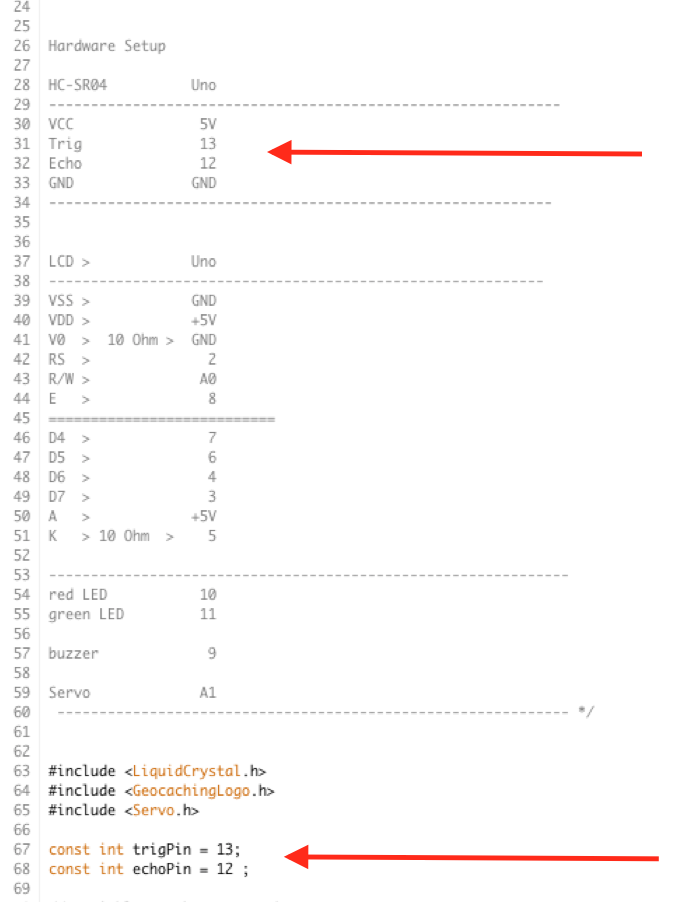
Usually I’m setting up the wiring based on the description on top of the sketch. And so I’ve done here. I discovered that in the description (lines 31 & 32) I declared Trigger to be wired wirh Pin 12, Echo with pin 13 while inside the sketch (lines 67 & 68) it was just the other way round. I changed the wiring and corrected the documentation on top of the sketch. Now all was running fine.
Below you can see a video on it. It’s starting with the part I filmed a week ago and showing the new set up from today at the end. (Clicking on YouTube icon will show in 1080p):
As ever: By clicking the YouTube button, you can watch it in 1080p…
You can pick the full sketch here…
Stay tuned!
Blog will be continued…