This is about my Tostedts LiLi (GC62T1J)
Vacation at the Rewd Sea passed by and the Wedding of the eldest son of my wife too. After some emailing with you and a visit of an „Exist Adventure“ in Stuttgart, I decided to built something new.
The first station will look like this:
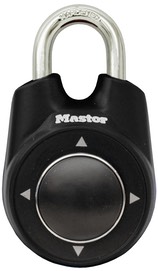
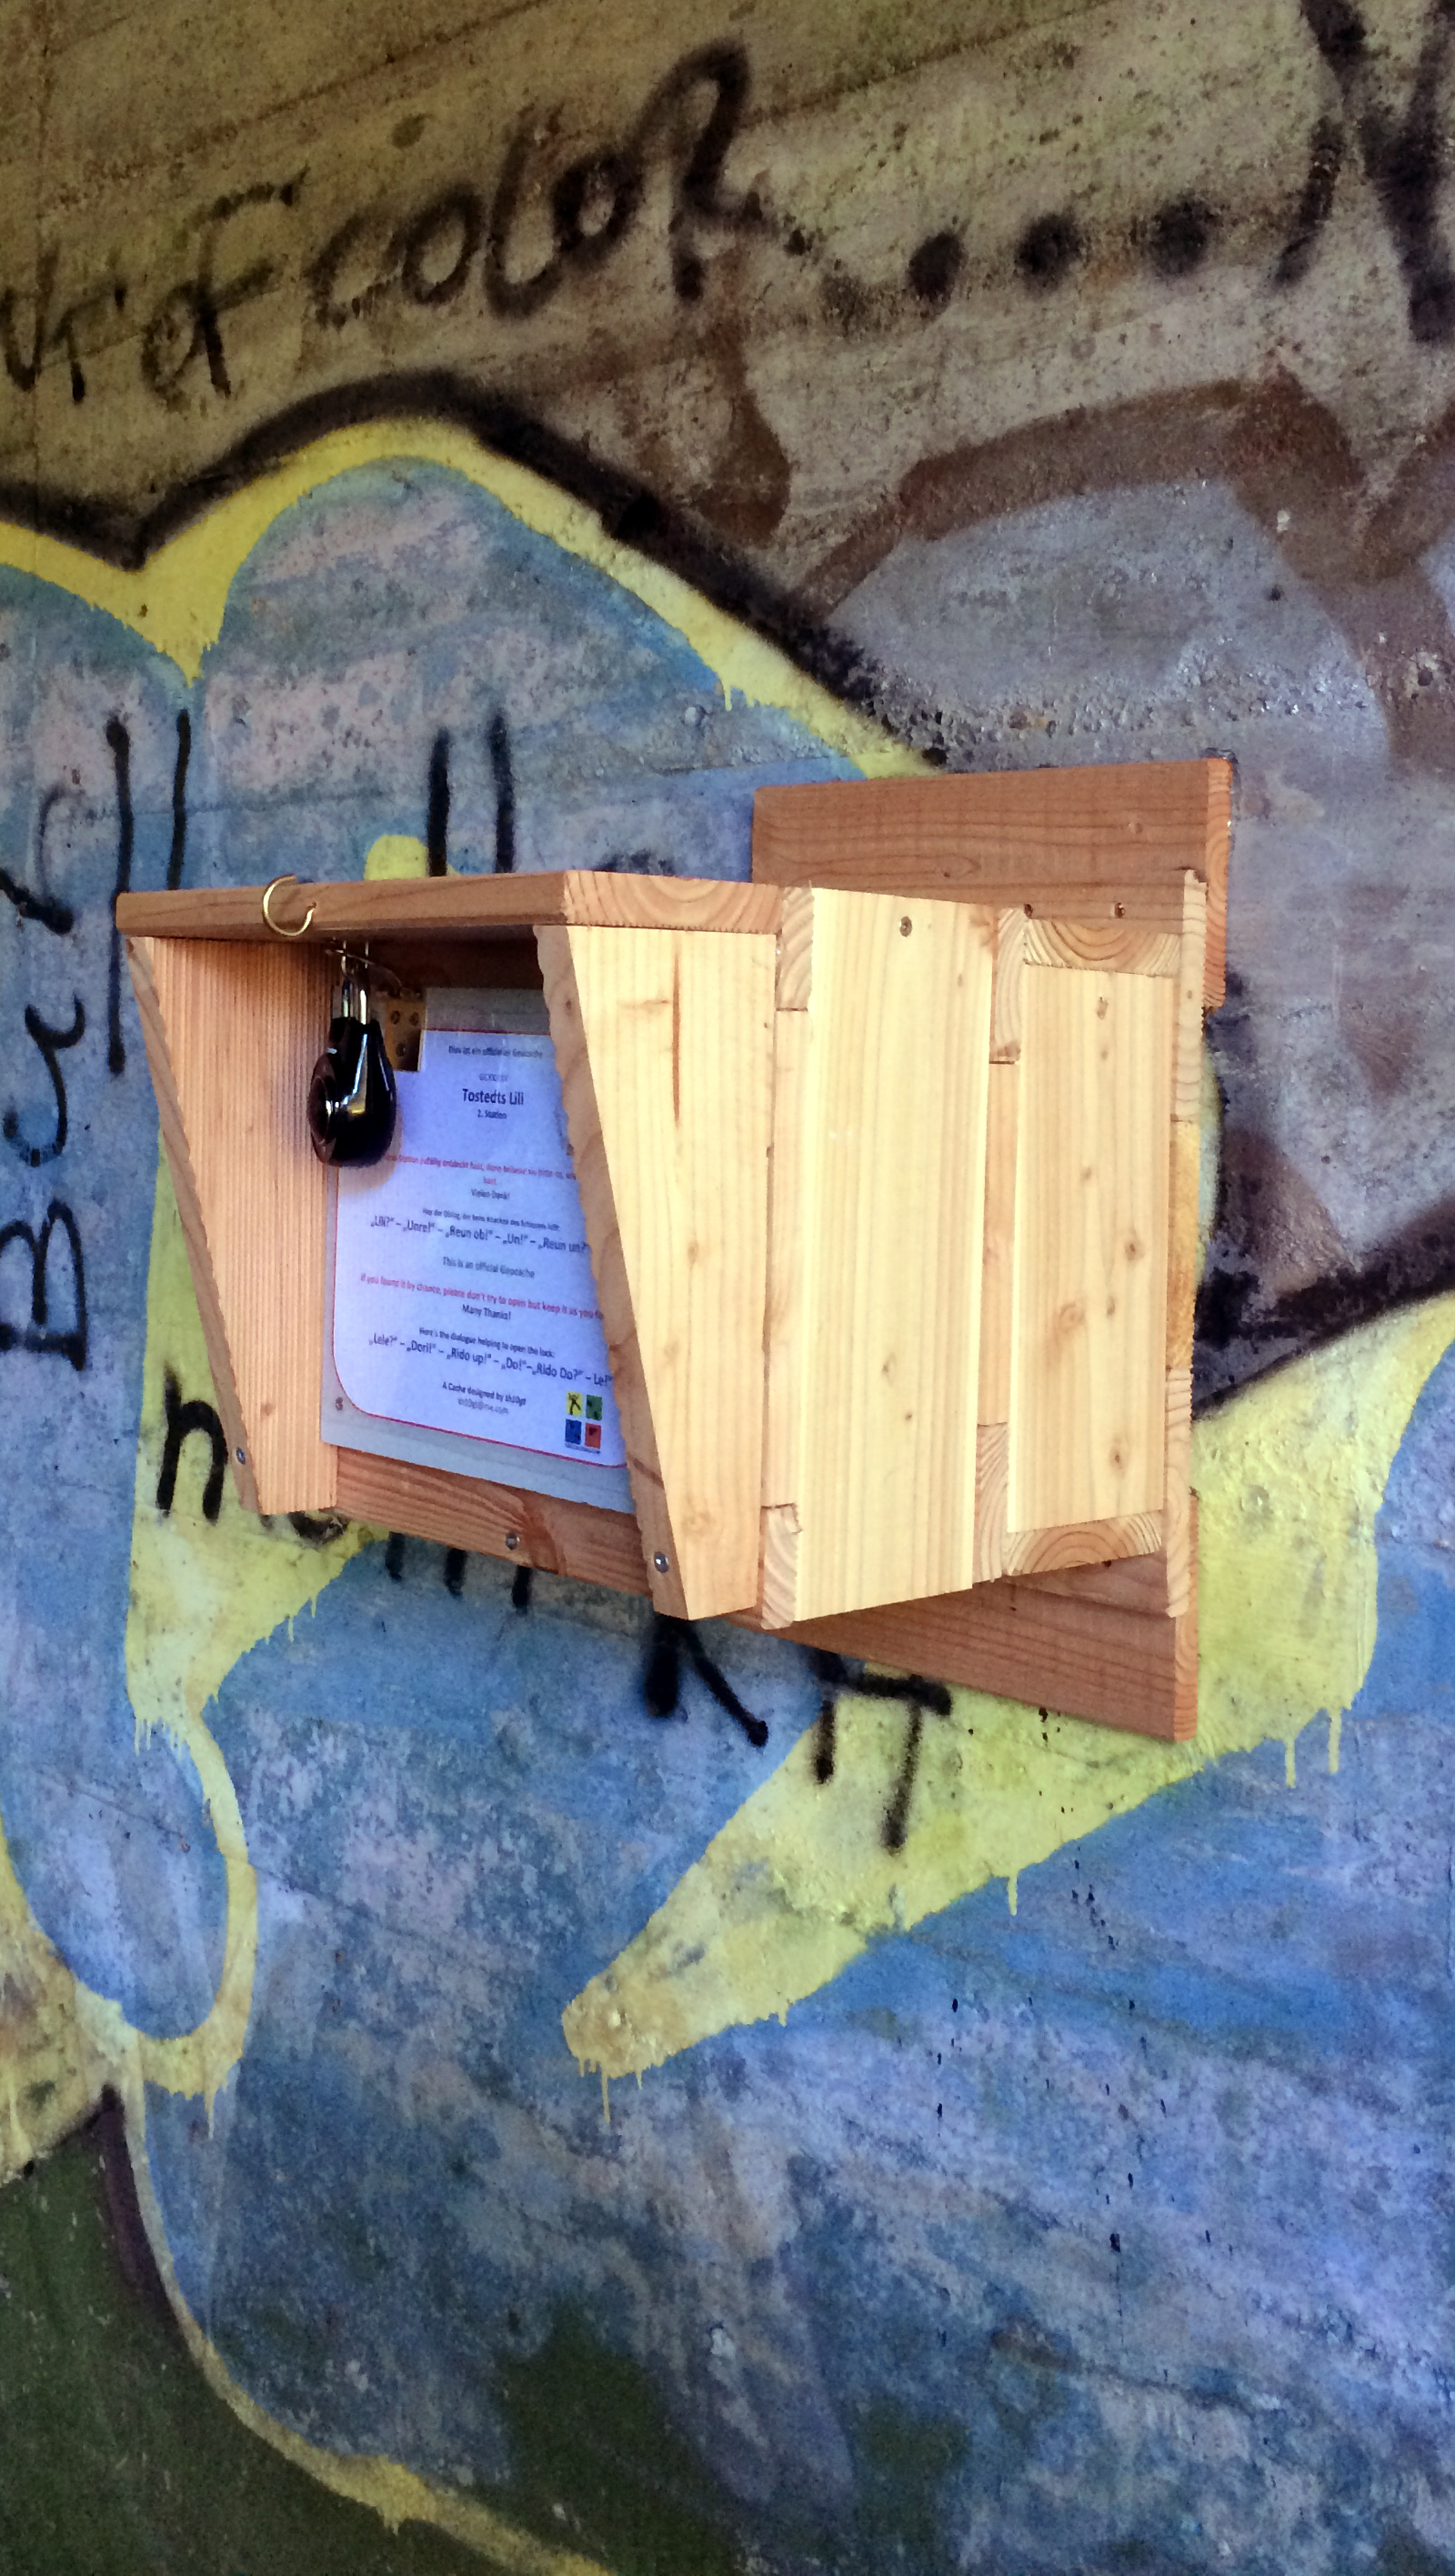
The filal will be a box with two doors - one behind the other. The first one is locked by a lock, I’ve never seen before:
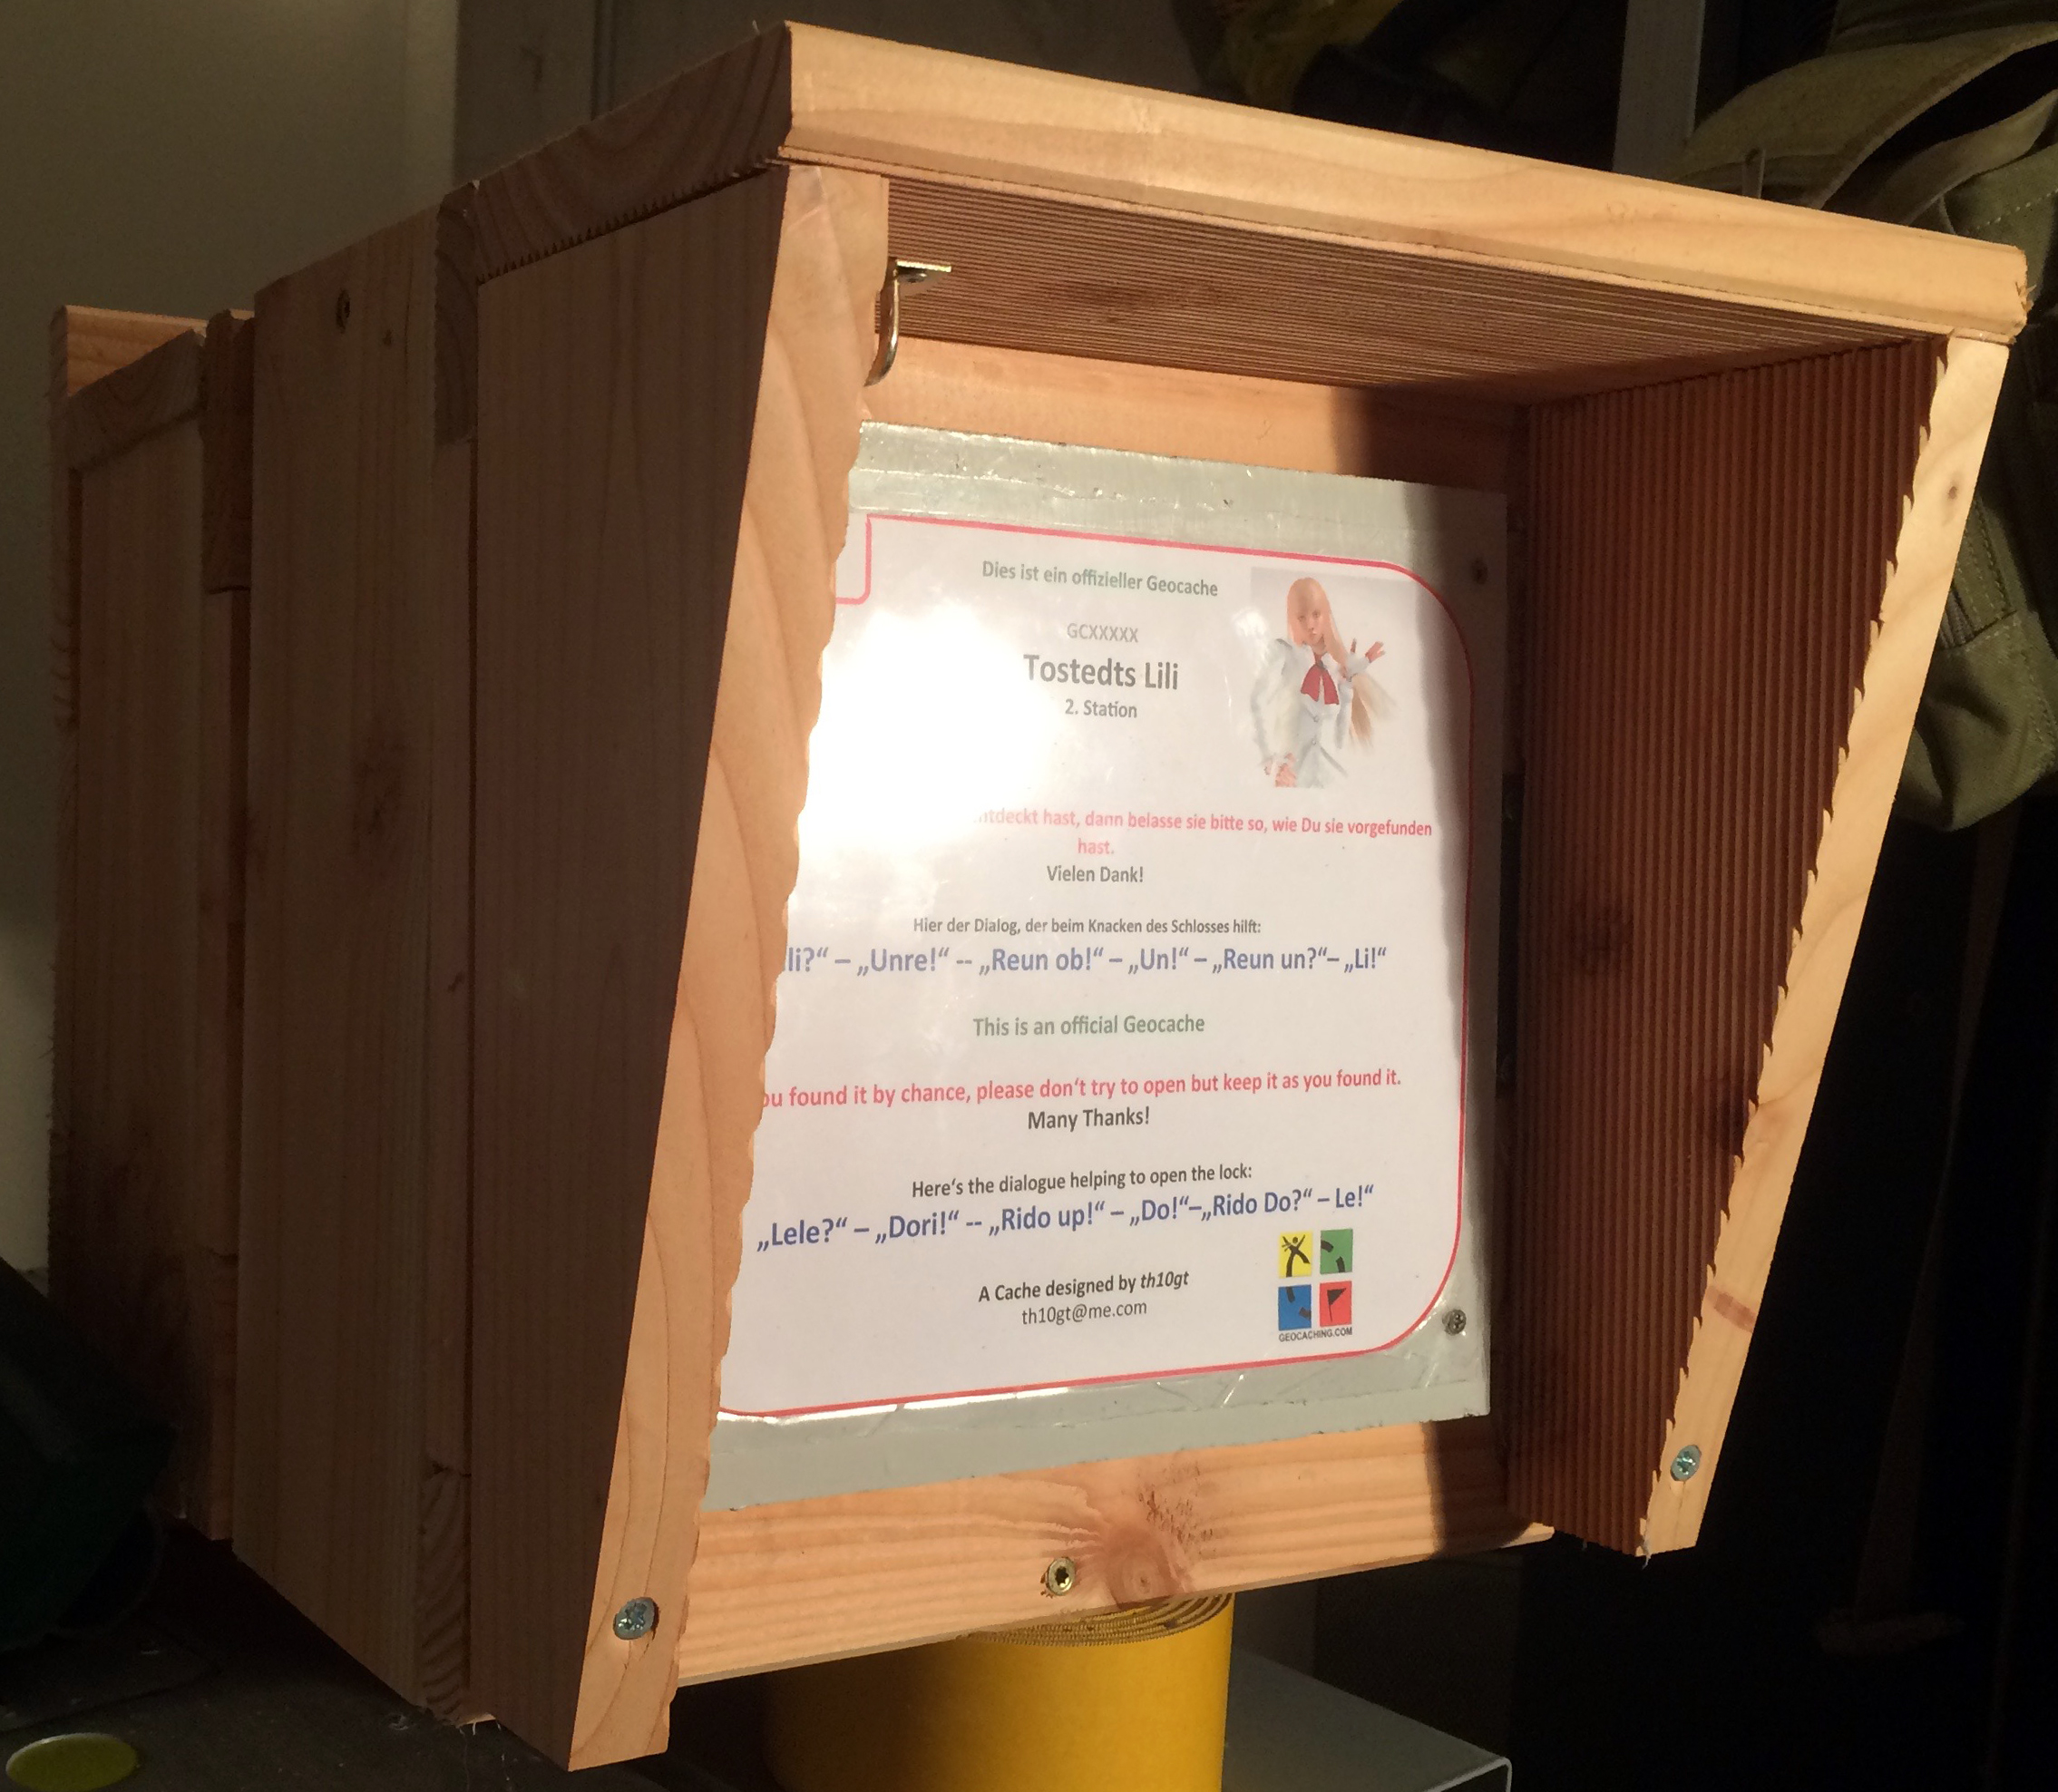
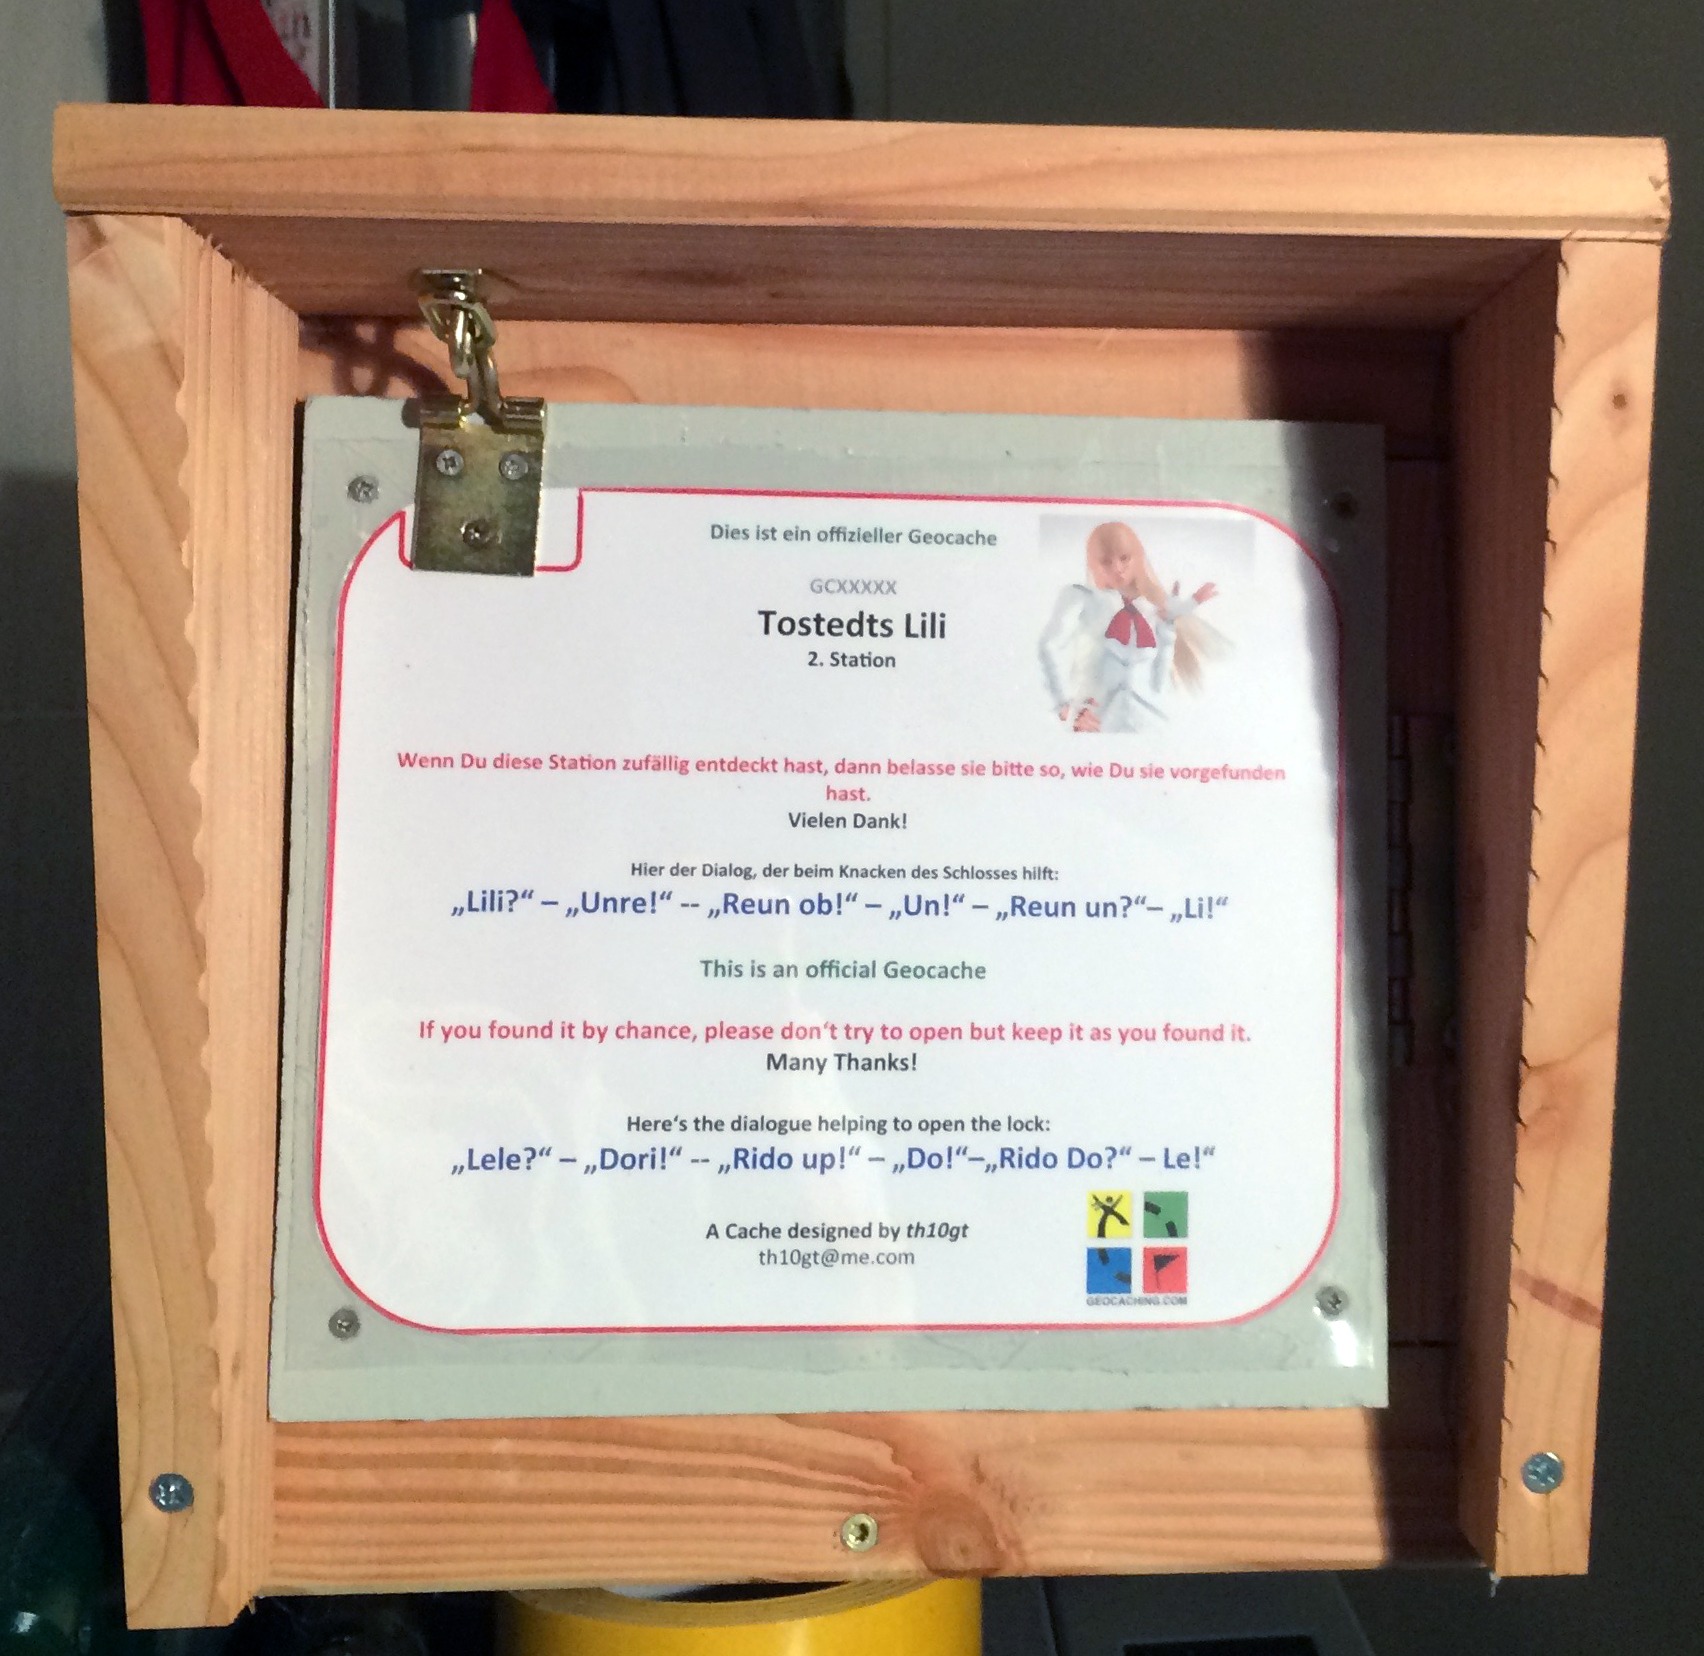
The front door will have a writing like this (English too to be prepared for your visit next year ;-)) ):

Below a previous version but with the solution on the right:
In blue there’s the exercise to solve. It sounds like a crazy dialogue in a foreign language. But every two letters are giving the direction to open the lock.
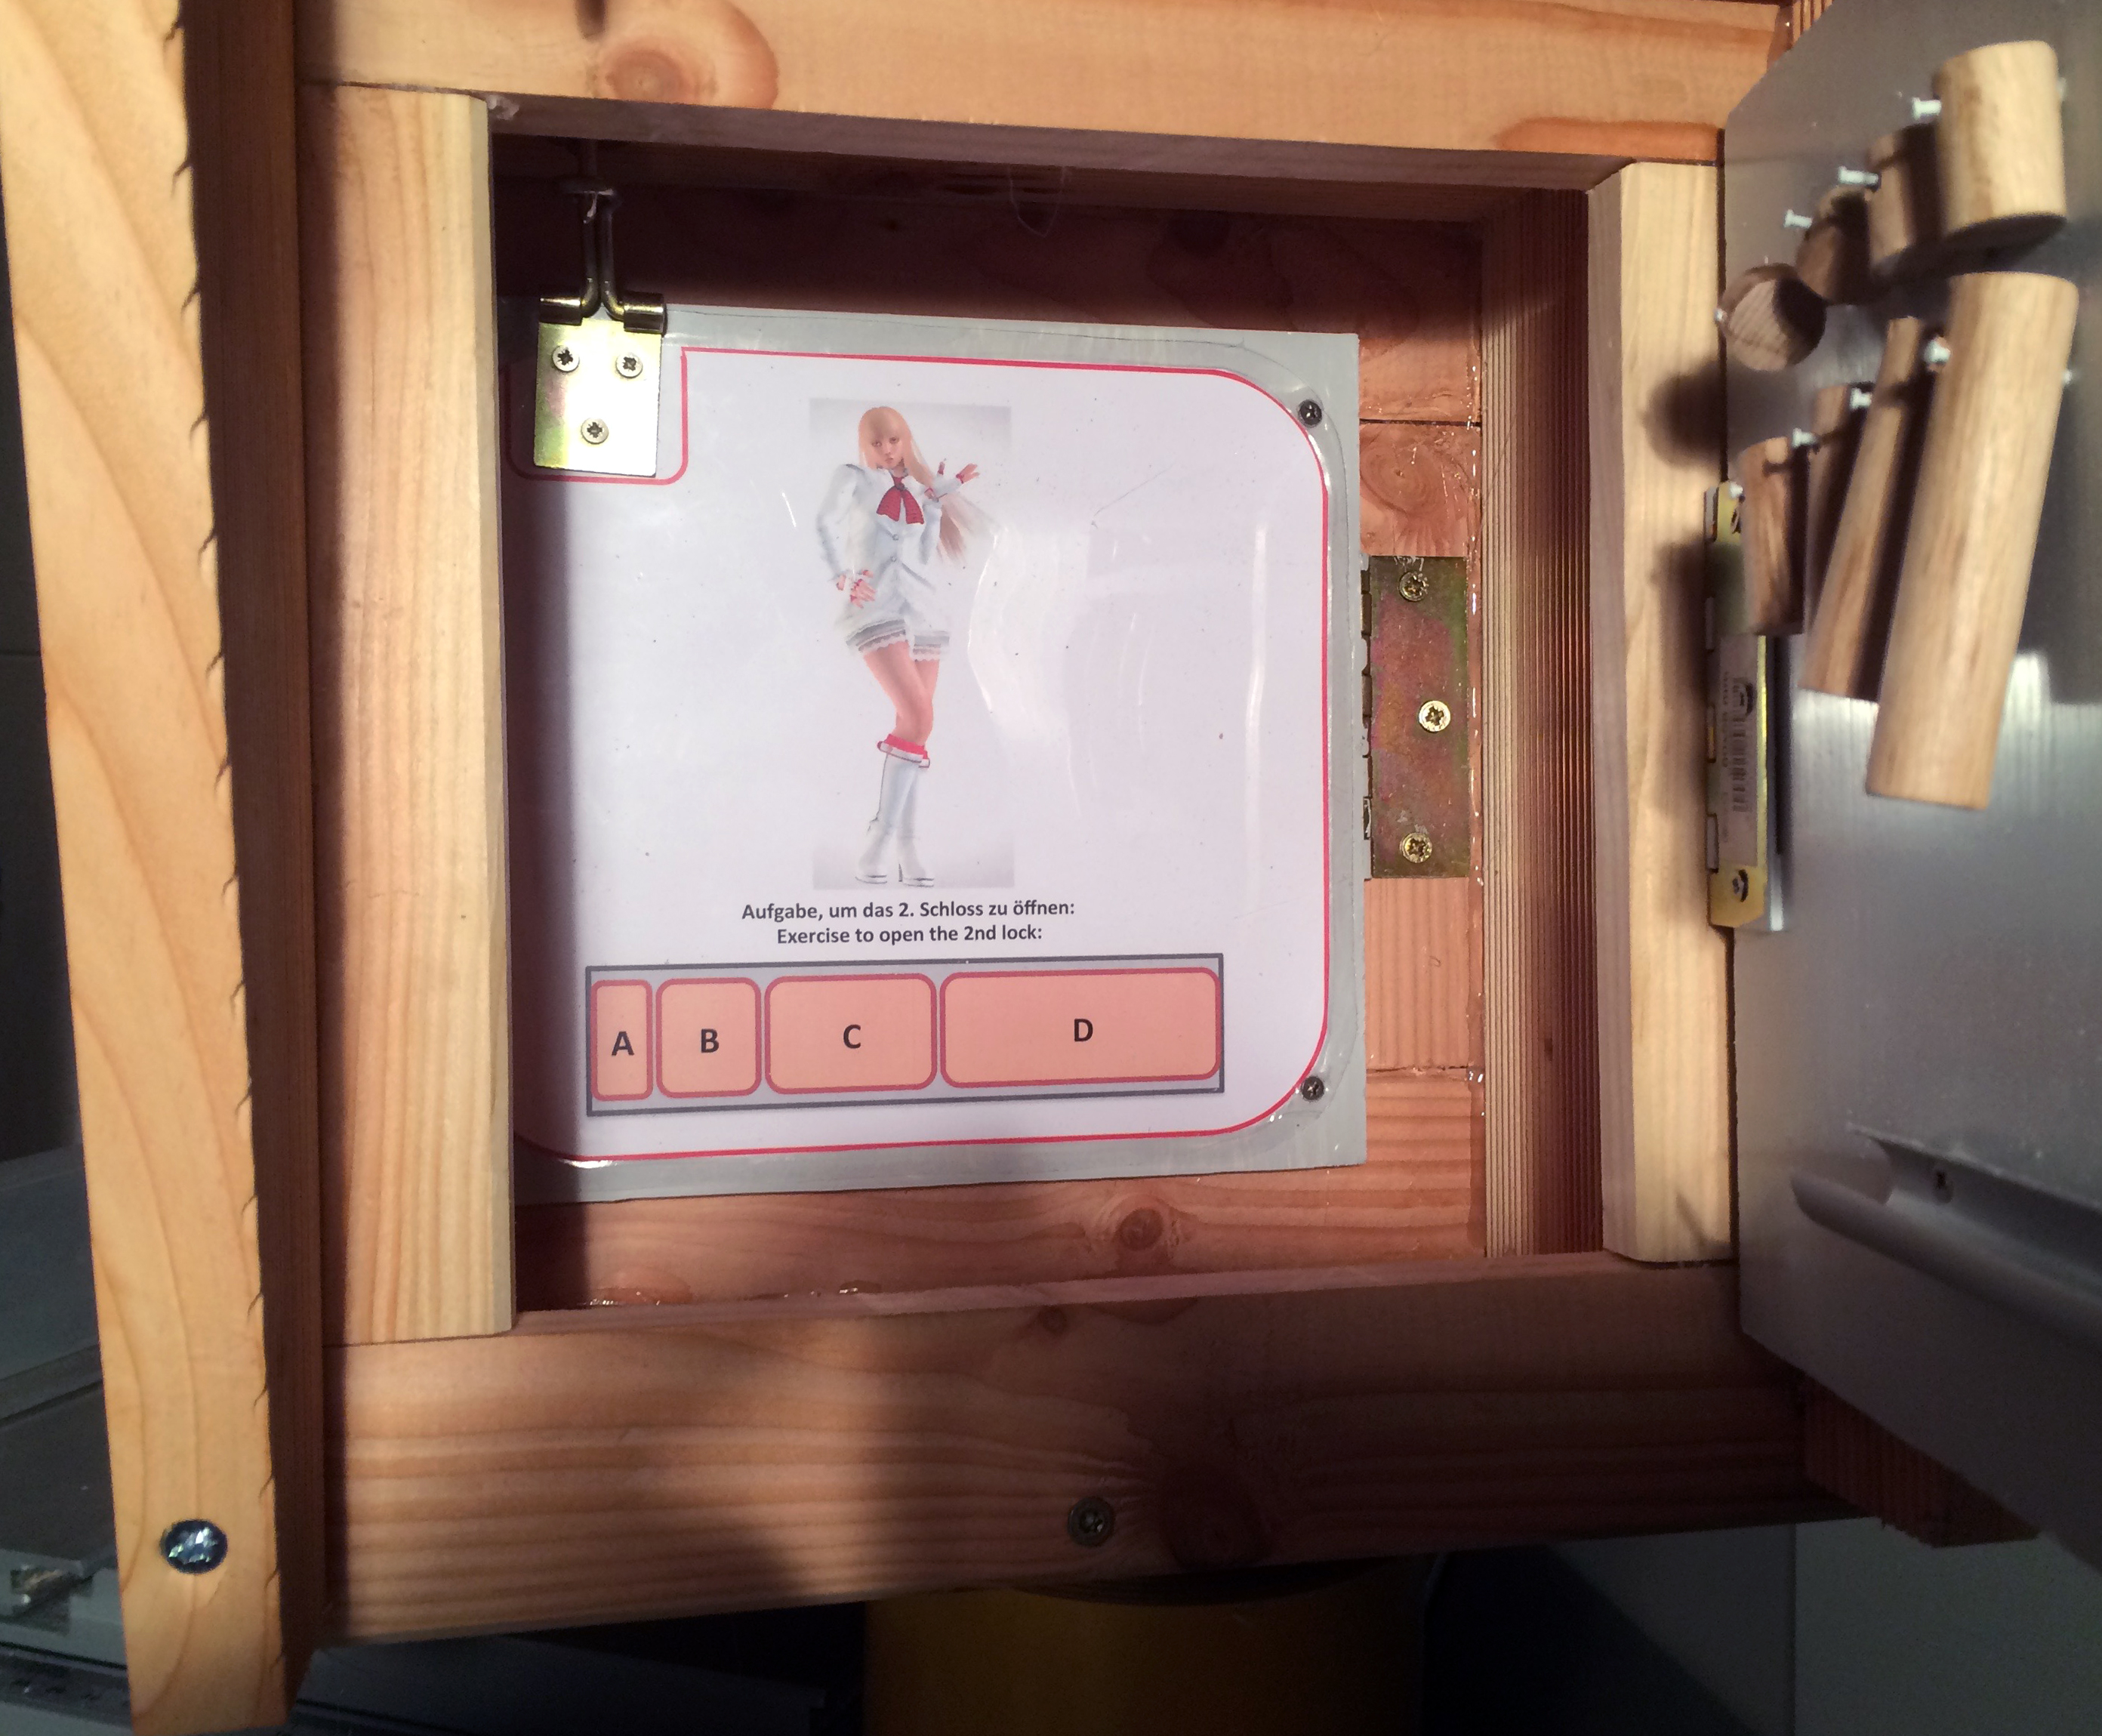
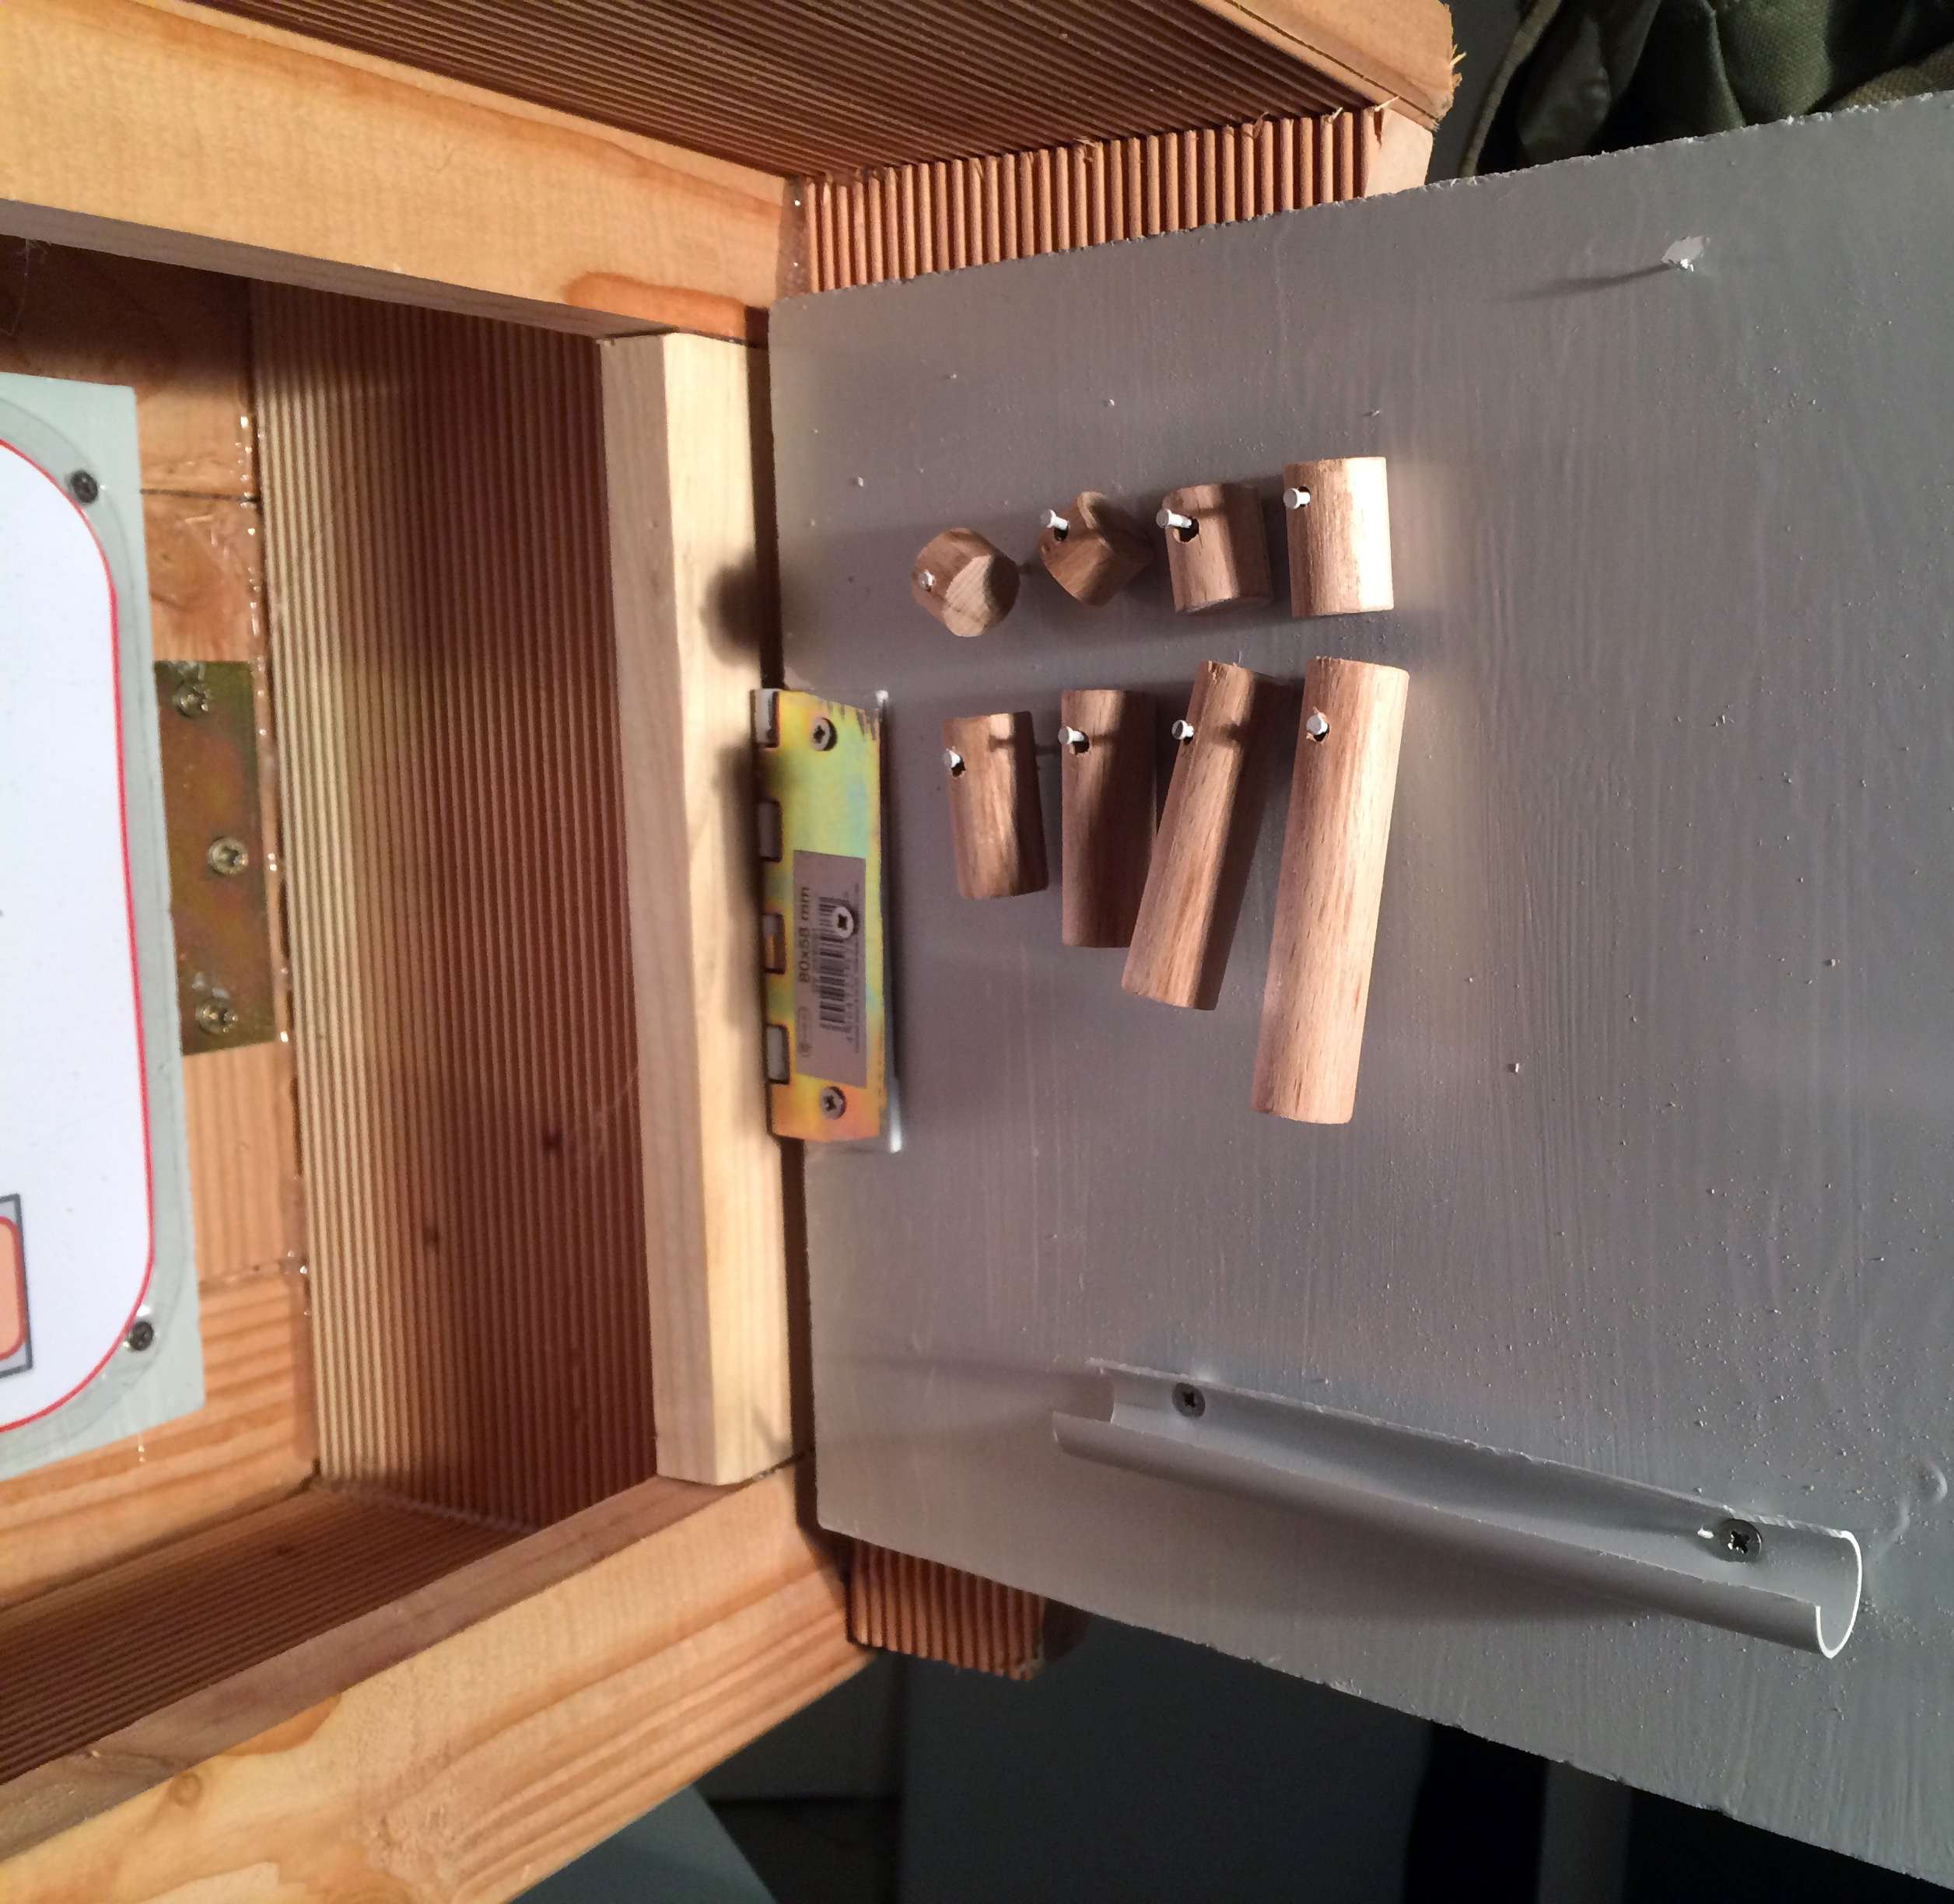
After opening the first door you’ll reach a second door. It’s also locked. You will see 8 rods with different lengths and figures on it. Also there will be a 13 cm long tube. You have to put the rods into the tube that the total length is exactly matching with the pipe.. Only 4 (yellow below) are matching perfectly. As shown on the second door you have to sort the 4 rods by length (ascending). This will give you the code to open the second lock.
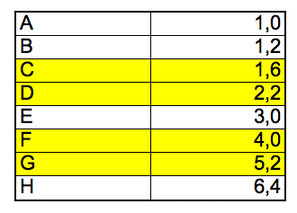
The table above is showing the 8 rods and their lenght in cm. Only C+D+F+G will match exactly with the 13 cm long tube.
Big change: 2 became 1…
At the beginning the Arduino part should become a separate cache. But now I decided to combine both of them to one… So the „Arduino cache“ became the „Arduino part“:
This is about the Arduino part (under construction)
This part of the cache is based on your idea, to step into the world of Arduino. We shared already some eMails, so I won’t start with the beginning of deciding to buy all that stuff.

More pictures to come and a video clip you can see here...
What are my experiences with Arduino so far?
- The quality of the board and all the other stuff is quite high.
- Being maybe too enthusiastic I already spend more than 300€.
- The programming language is something very new for me, but I’m more and more convenient with it. But the biggest problem up to now was to convert numbers (integer, floating) to characters for displaying them on the LCD display. I’ve talked with a colleague of mine, who’s a professional in programming. He said, that the Arduino language is very „Italian“ because not strictly in line with the C/C++ reference. But also C/C++ is not very logical because it’s a mixture of old terms (like FORTRAN) and new object based approaches. E.g.: The square root of a figure n is very common vor me: x = sqrt(4). But why the substring is written like this: y = „ABCDEF“.substring(2,3)??? I hate that! Even if your’re knowing the term of the function, you need to know, how the „grammar“ is: function(x,y) or x.function(y)...
- Starting with a GPS application wasn't the best idea, because you have to do a lot of programming outside and to move to check the code.
- Programming the distance ands the compass degrees of the distance to go brought me back to old school days when I’ve learnt (and forgotten) trigonometrics.
- When discovering that something doesn’t work what worked yesterday is a nightmare. I tried a lot of things for 90 minutes up I was discovering that I damaged at least one of the RX, TX pins on the board. Next time I’ll try different pins much earlier.
This is the concept of the cache:
- After having opened the second door at station 1 the cacher will discover a container with a box in it. This box contains the Arduino. In addition there’s also the log, but secured by a third lock.
- He has to plug his 9V batterie and to wait up to the GPS found the satellites. The display will show the coordinates for station 2.
- During walking to the station, Arduino will show all the time the current position and the distance to the station. All in English AND German.
- Reaching this station, where nothing is hidden, the Arduino will be aware of that and guide him to the third station.
- It’s exactly the same as with station 2. The cacher will be guided to station 4, which will be station 1.
- When Arduino is discovering that station 4 (which is station 1) is reached, it will show the digits for the lock on the display.
- At the end Arduino will ask the cacher to be dropped at station 1.

What’s still missing?
- What’s now on the breadboard must be finally built on a circuit board.
- Last not least everything must be built into a box. I’m just wondering how I’ll cut the rectangle for the LCD display out of the box… (The picture above is showing the small box and at the bottom a small board for the final built. It can be attached to the Arduino (a click will guide you directly to Amazon)).
- I need to buy another small box for the log and close it with a third lock. This one must not be bought, I have it already…
- I need to find a good location for this quite big box ( h = 30 x b = 30 x d = 50 - 62 cm) and also for the „ virtual" stations 2 and 3.
- After that the listing must be prepared and also the banners, the certificates for FTF, STF and TTF…
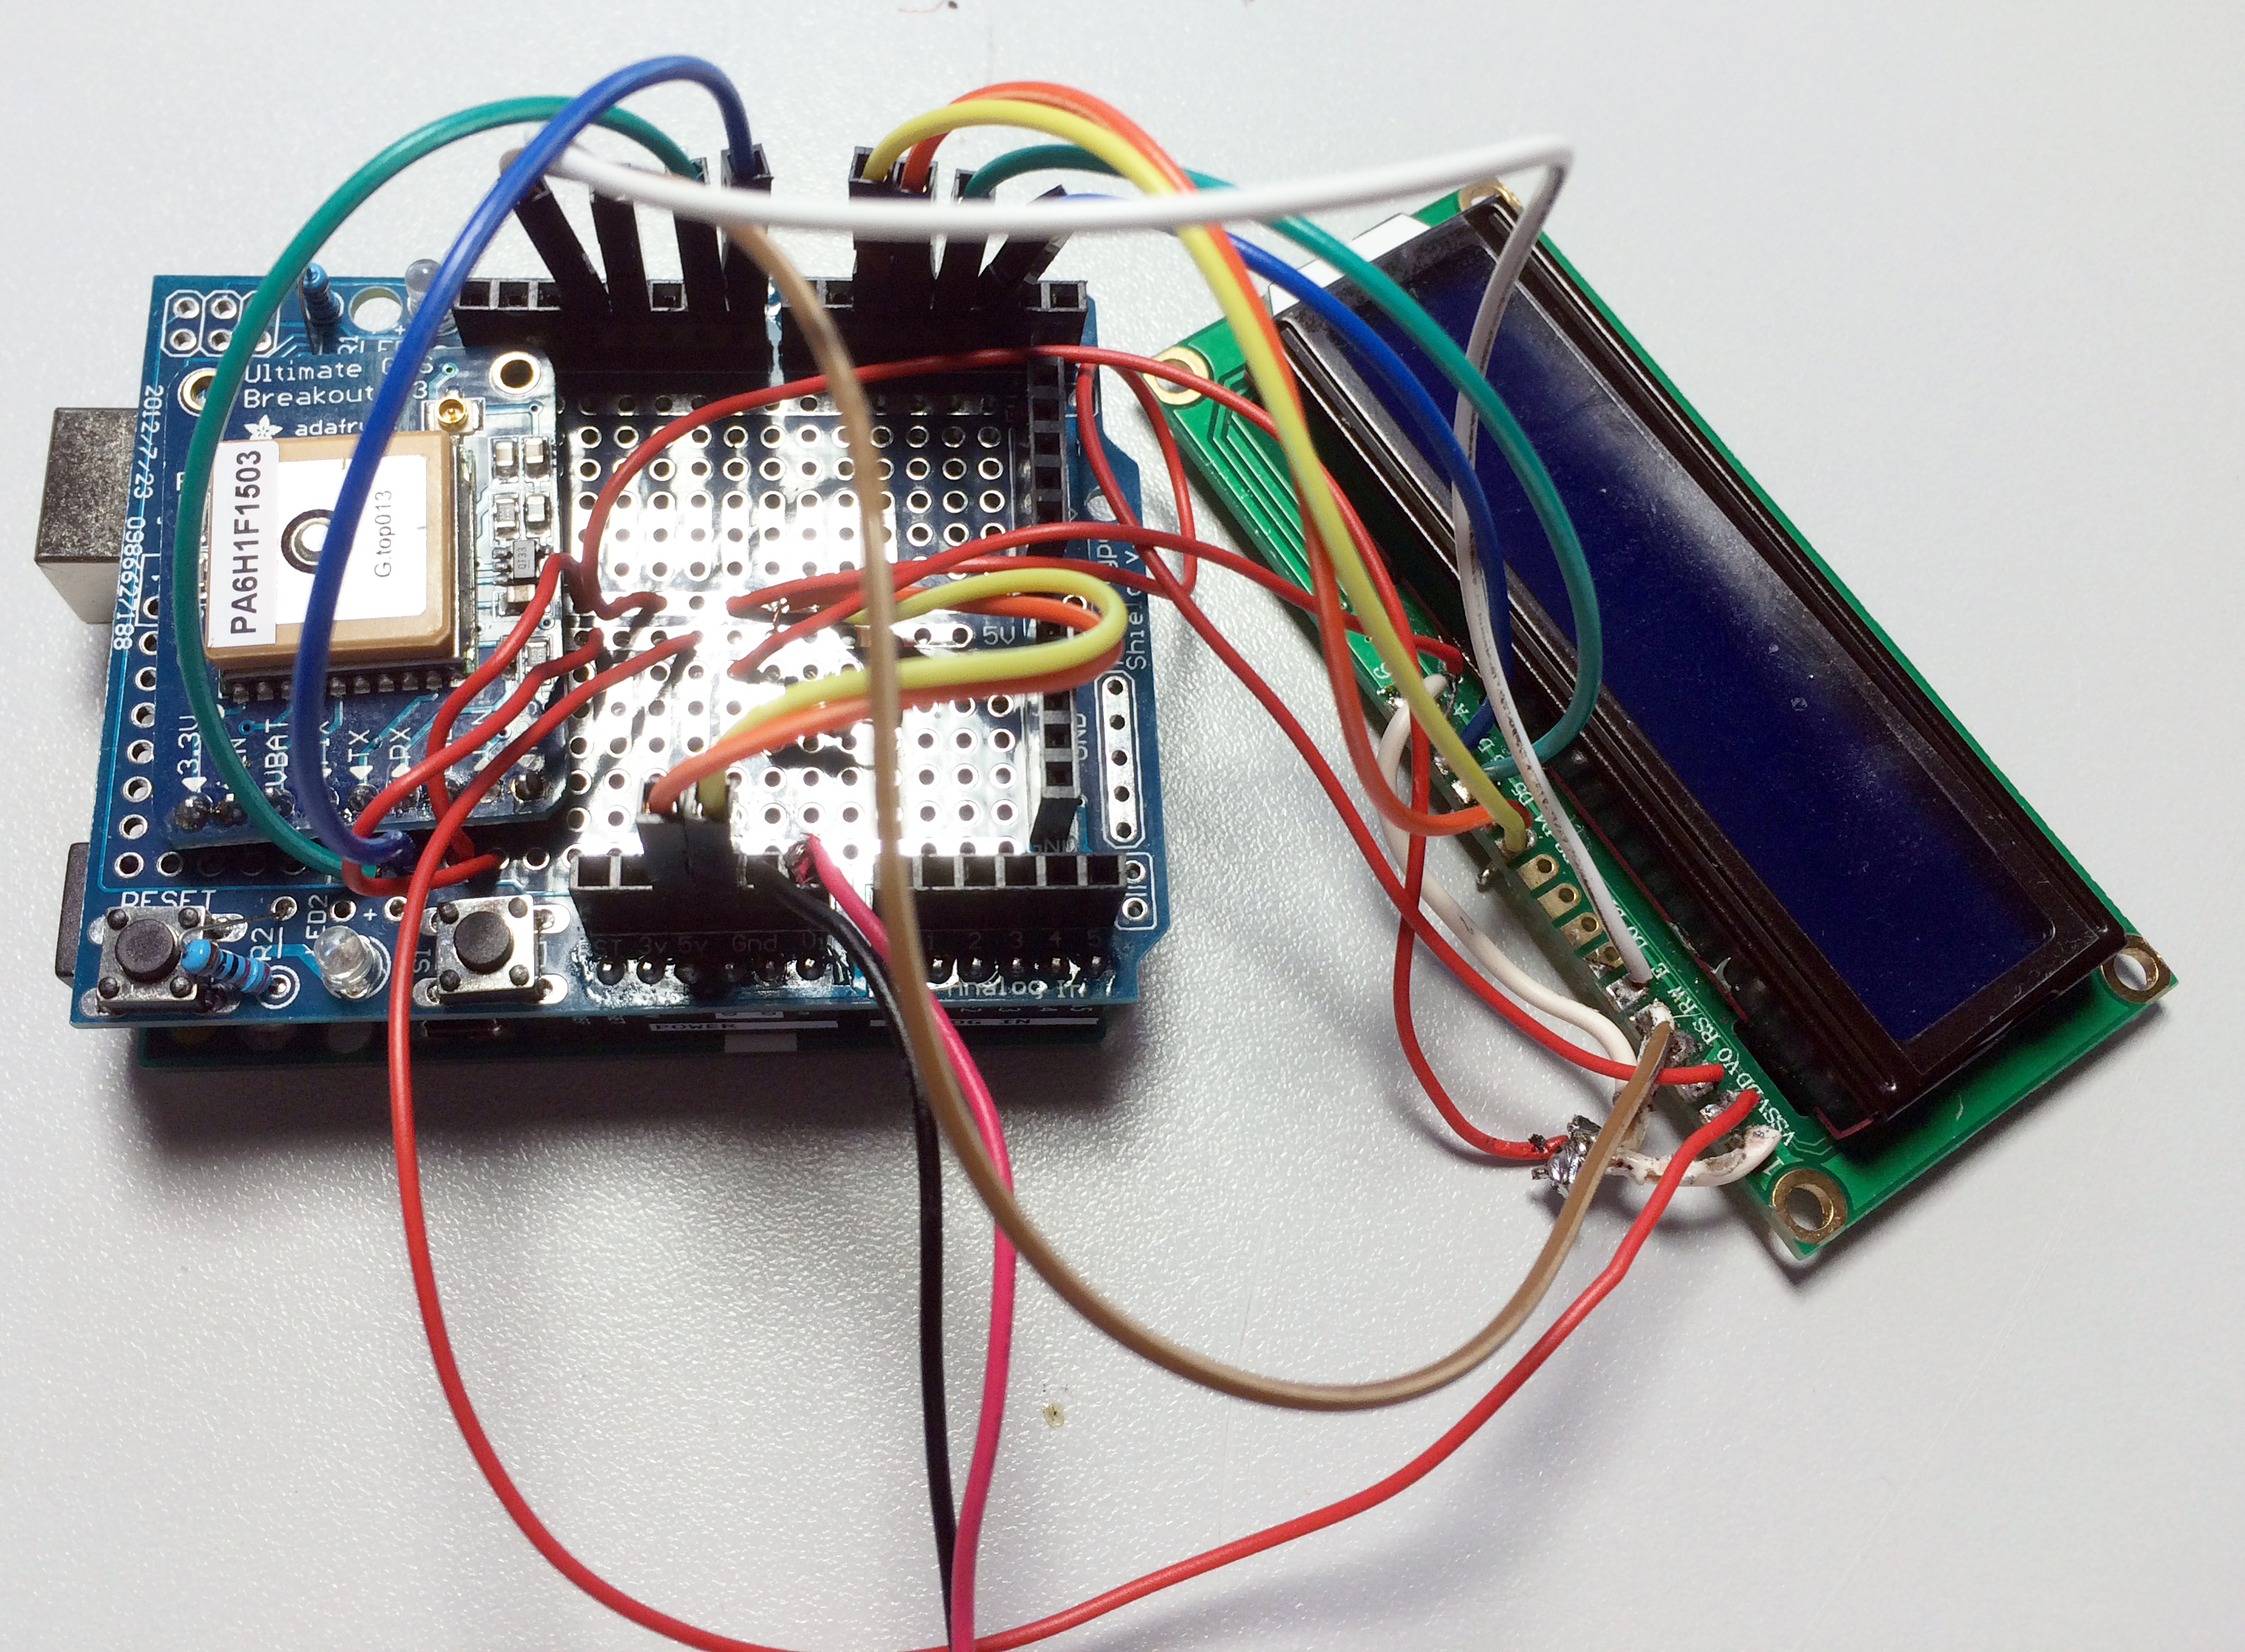
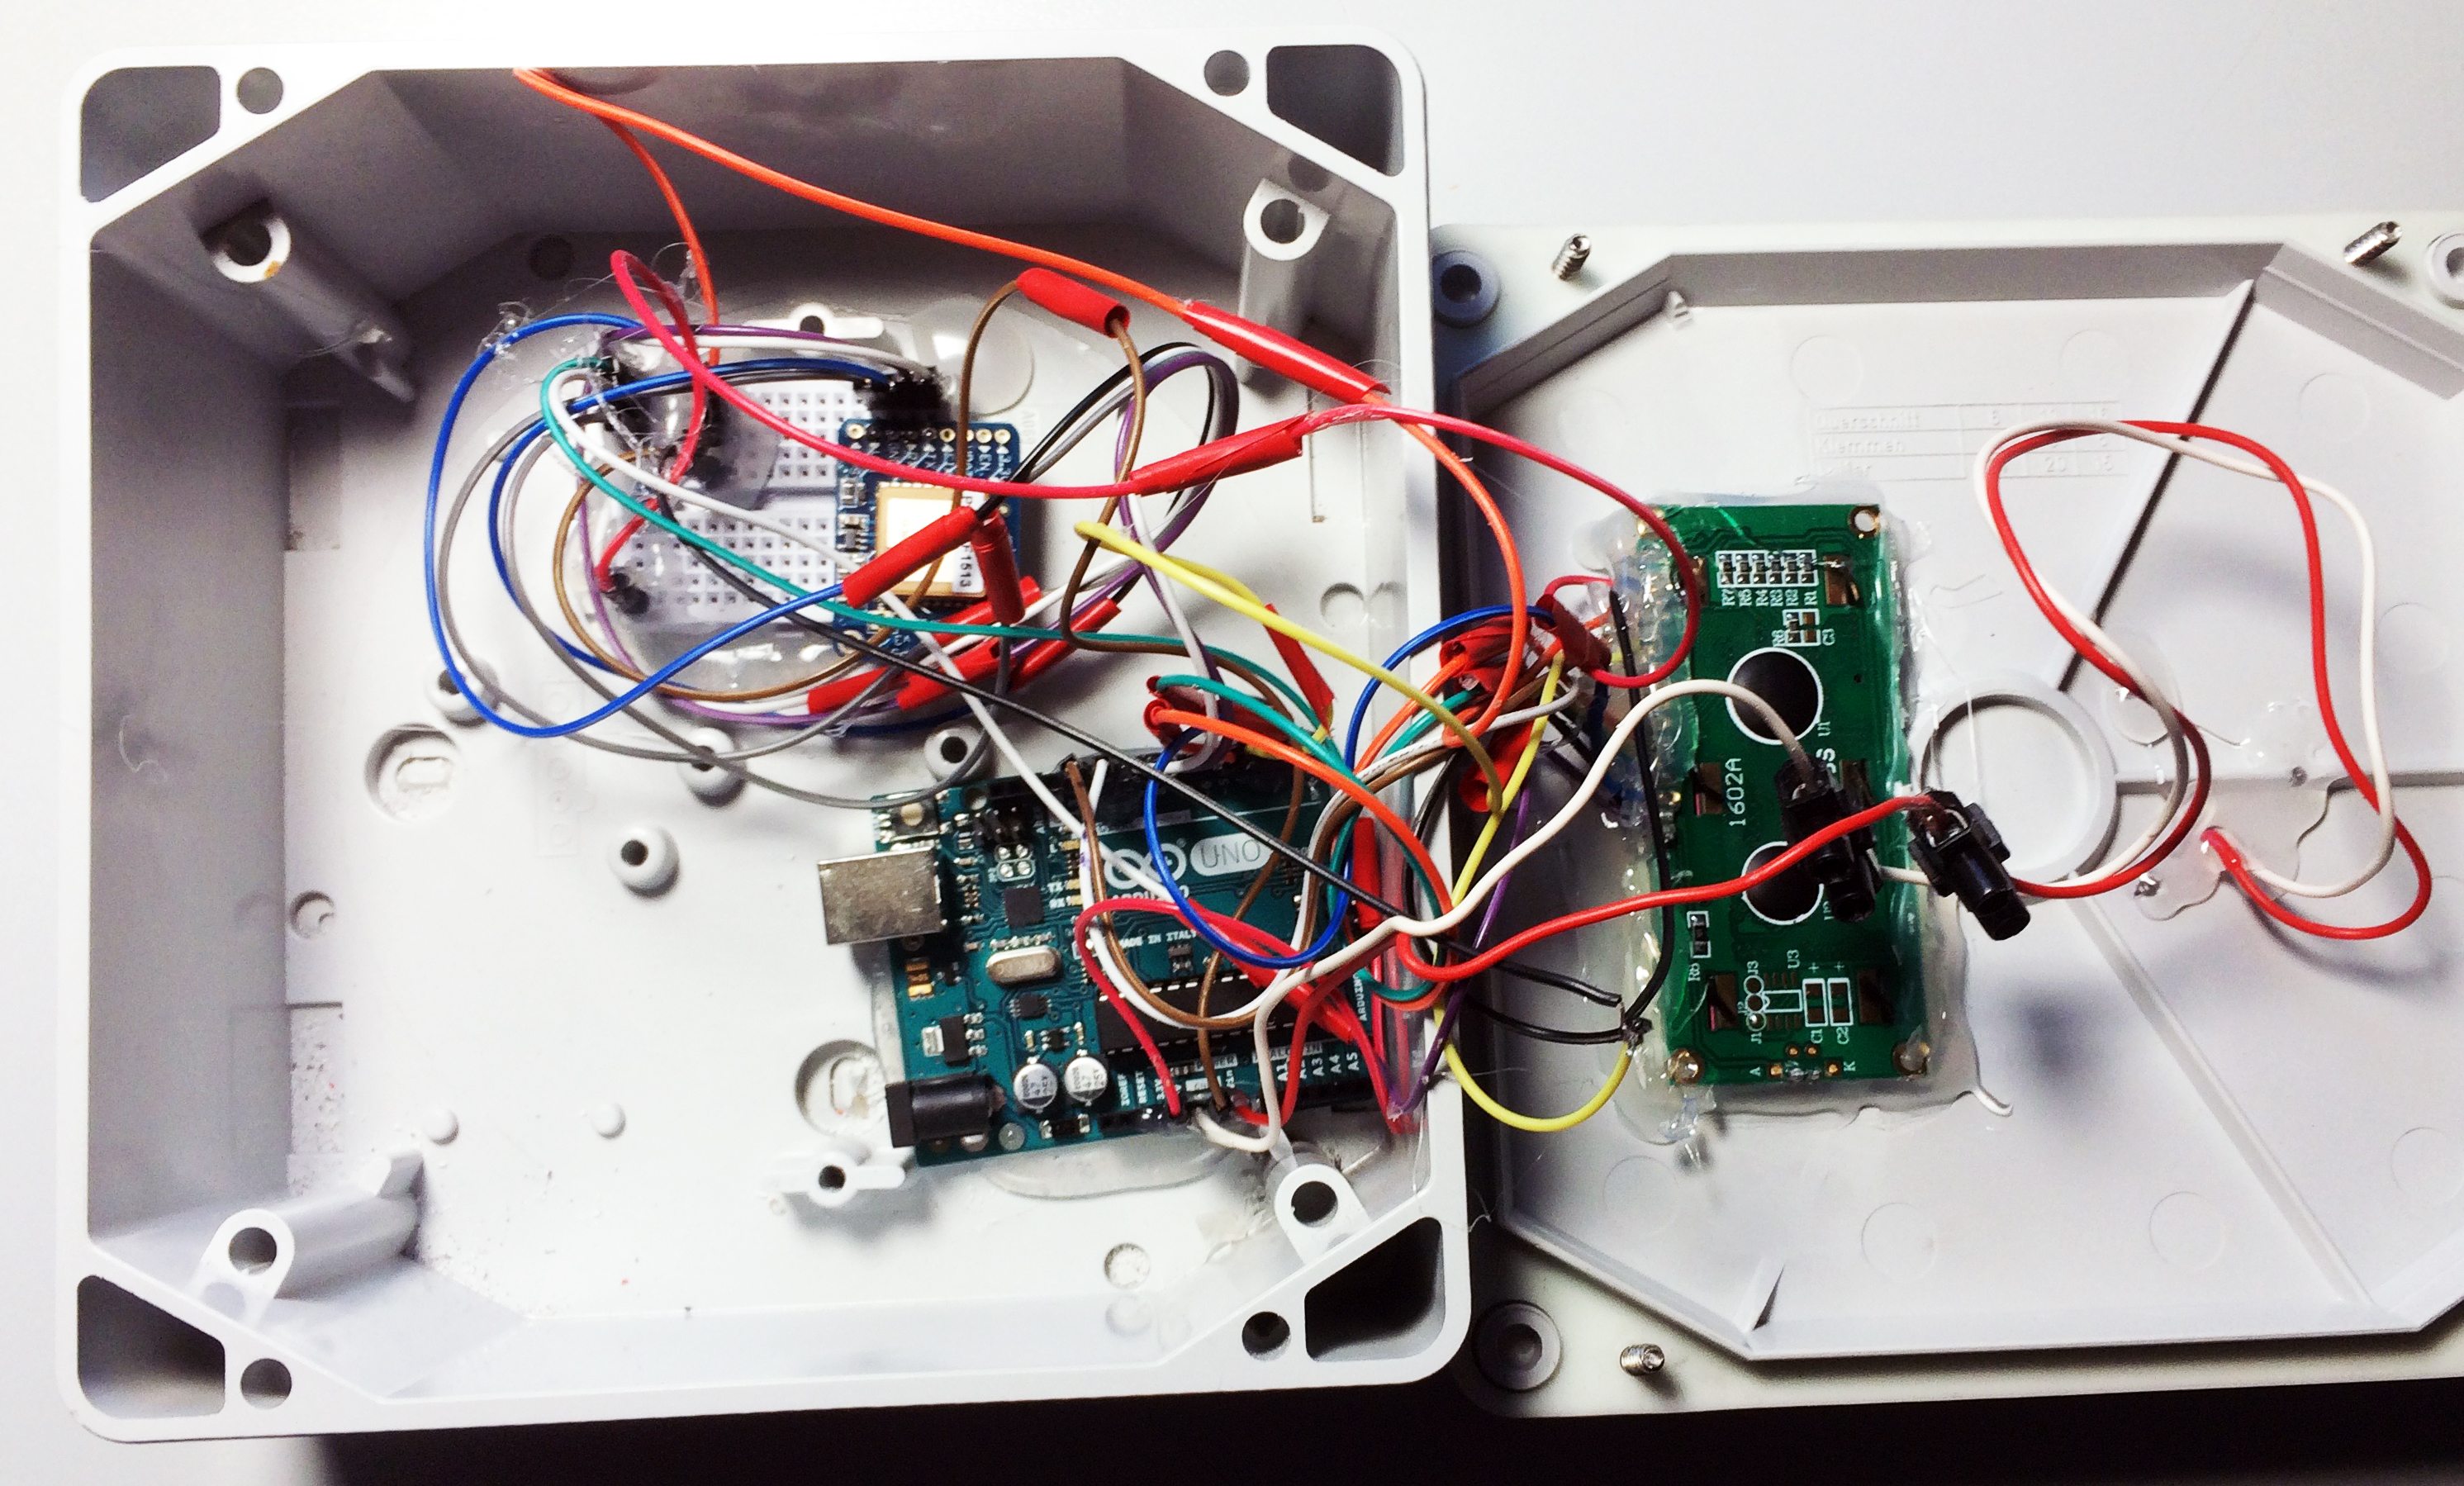
In the meantime (Saturday, 29th) I soldered the things together on the board shown above. It’s looking pretty nice. See below. The first picture is showing the Arduino, the board and the LCD. On the second the board is plugged into the Arduino:

But unfortunately it doesn’t work (as expected…) Tomorrow I’ll try to find the mistake (or mistakes)… But there’s also a good news: All the things are fitting exactly into the black box above…
In my Arduino Blog there’s now a page showing how I’m storing all the expensive stuff in a carrying case. This was really a good invest.
Sunday, 30.8.: My frustration is becoming bigger and bigger…
I’ve thrown the old board into the bin, made the complete cabling again (much better now), on a new board. Now I’m knowing, why I bought 3 of them… But it’s still not working.
Have a look: The board is already attached on top to the Arduino:
What a shit! Maybe my old eys are not good enough for soldering such tiny things. I’ll look for someone who would do that for me (and being happy to earn some €€€…).
Monday, 31.8..: I’m such an idiot!!!
I was wondering why the boards as shown above are coming with a very small breadboard (see below).
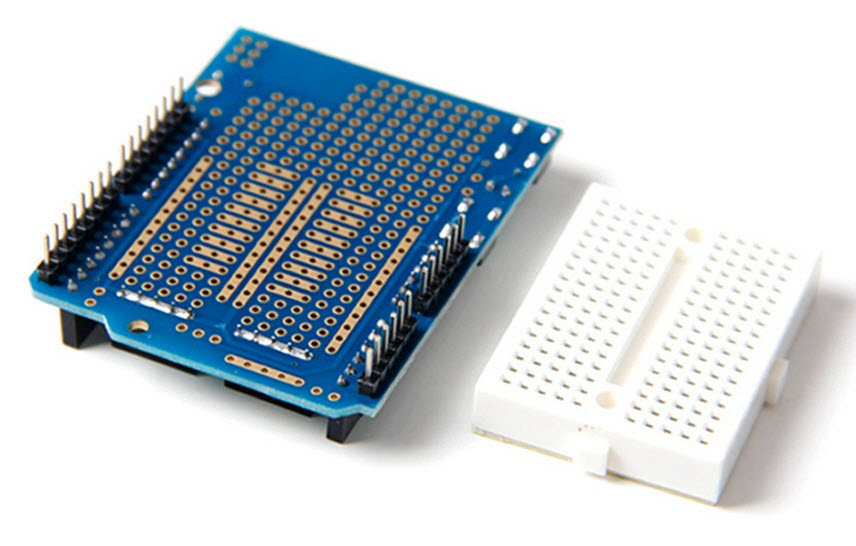

You can use this breadboard to bring together all your stuff on it and when everything is working fine, you can attach it by a self-adhesive foil on the board. No soldering needed. Great!!!
This won’t help me with this cache, because the parts must be soldered, because the box will be moved, but for future projects when the Arduino will stay inside the cache… But this boards are great. You can find them here at Amazon …
Tuesday, 1.9.2015 : Success is coming back…
Yesterday evening I set up the hardware wiring again on the tiny breadboard. And it’s working. Unfortunately without the GPS part, because it didn’t survived two times soldering and unsoldering. Roughly 50€ burned and I quickly ordered a new one…
Regarding the soldering: Eric said, he would place his Arduino builts on the breadbord into his caches but for mine I was also thinking that the parts must be hardly fixed together. Speaking with a collegue of mine during lunch he had the great idea to fix the parts on the tiny breadboard with some hot glue. Really a great idea. I’ll test it…
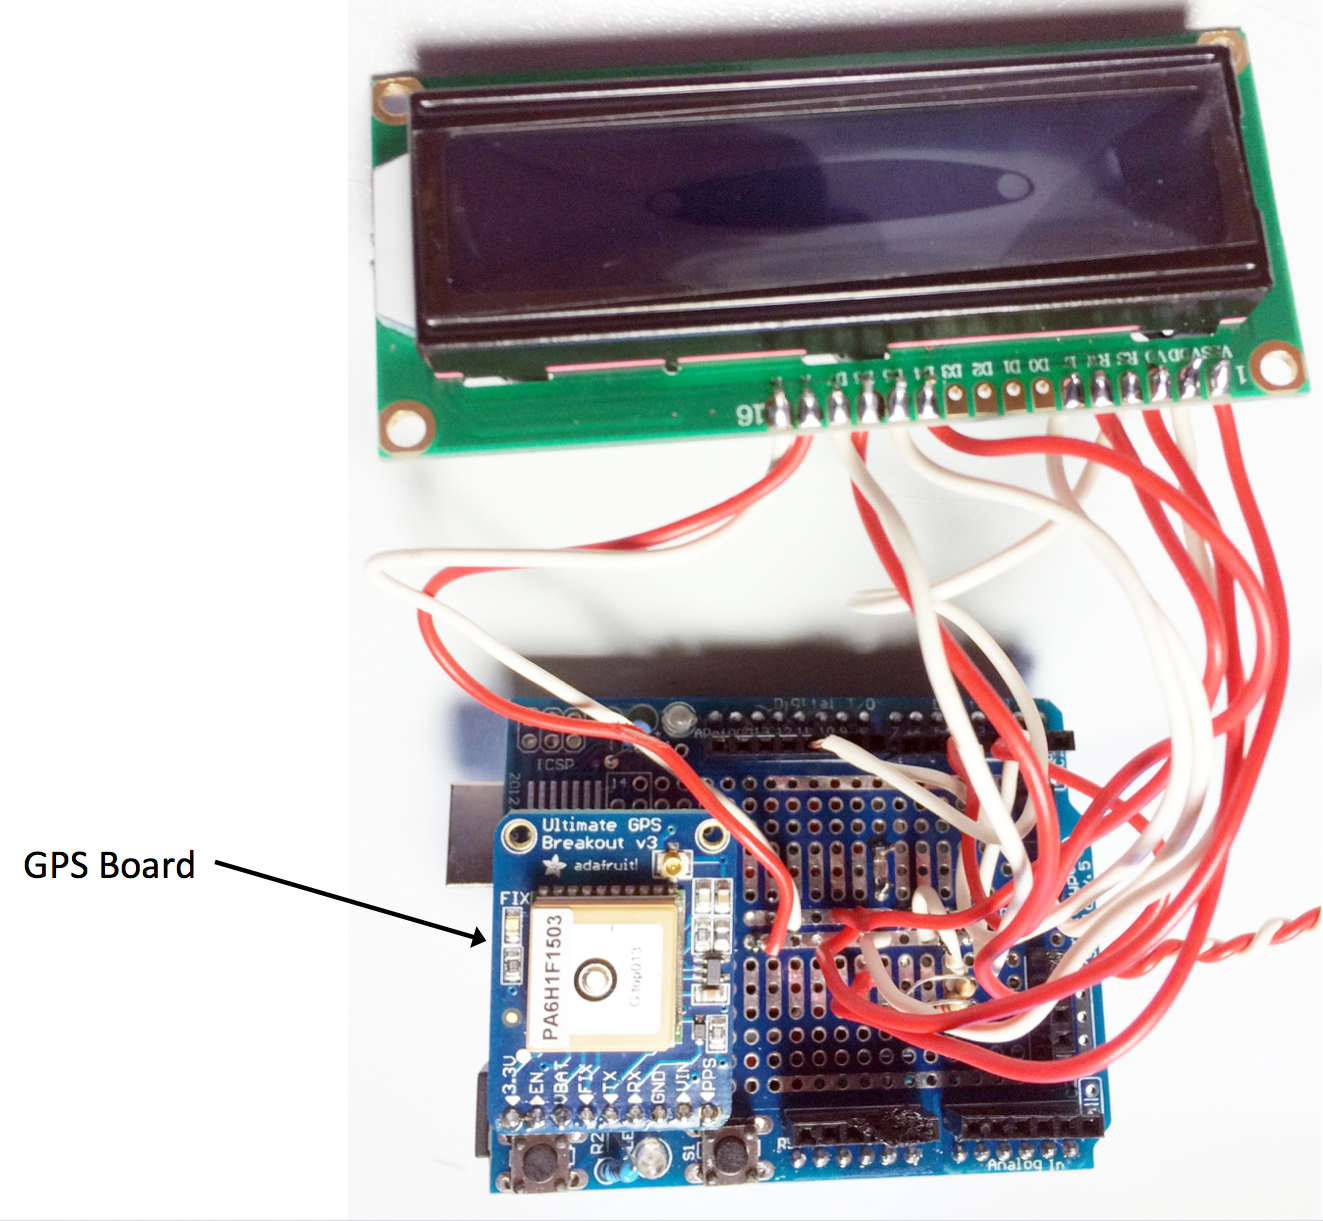
Here’s the wiring of my hardware:
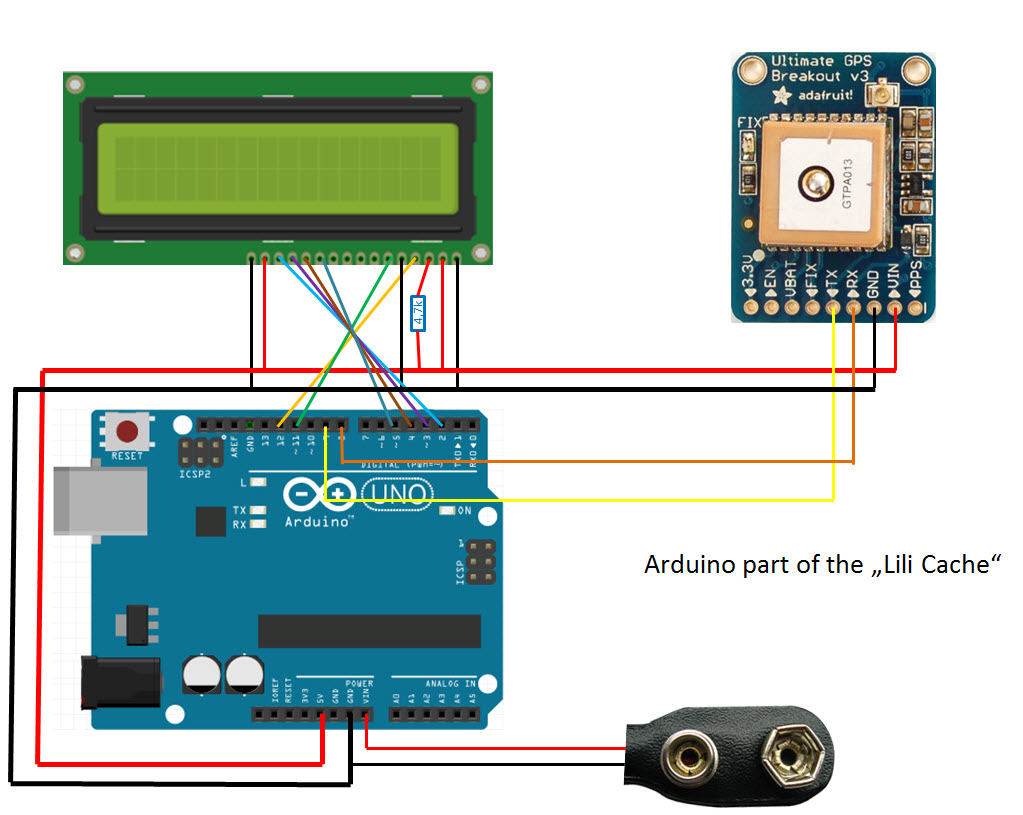
The sketch you can pick from here (it’s quite a stable and running Version 1).
Wednesday, 2.9.2015 : New video clip
The new GPS module arrived yesterday and I attached it to my wiring. To be honest: I needed to change some of the wirings to have at the end everything correct… So, maybe, the problem wasn’t because of my eyes when soldering but with my brain when doing the wiring… I made another video clip and I’m sharing the sketch with you…
In reality the scrolling text is readable. Maybe an intereference with the frequency of my camera...
Friday, 4.9.2015 : Waiting for the weekend
The days are passing by and what I’m doing? Quit a lot not related to Geocaching or Arduino. Especially I’m working, because I still have to earn the money for the daily bread… But during some free time:
- I optimized the sketch to make it more handy for you or others to use. E.g.: I added a variable to decide how close the cacher must find the virtual stage to receive the coordinates for the next station. Other example: I modified the code in a way you are able to change from 3 stages to less or more. But be careful. The compiler is already warning that availabele memory is quite low.
- A collegue of mine hopefully cutted the rectangle for the LCD inside the box. I was so sure that it would look ugly if I would do it by myself. So I asked him, because I’m knowing that the result of his work will be perfect. — I just received it. Great work he did. I’ll present a picture quite soon...
- Due to the fact the month is quite young and money is back to my bank account :-) I went on buying. Most expensive have been a desk lamp with a magnifier giving 5 diopter. (I also bought the 8 diopter lens, but this is offering not enough depth of field.) This lamp is really great! Some other stuff especially for organizing all the parts, cables and especially the resistors, I also ordered. And also some RGB LEDs. I don’t know for what, but now I’m owning some...
- I started to set up the listing. Now Lili has already a code: GC62T1J. I had two questions when setting up the listing. Do I need to declare the station with the log, which is the final, but where also the GPS journey begins, twice? Are the GPS stations really „virtual“ ones? I asked a reviewer couple, which already helped me in the past and received this answer tonight:
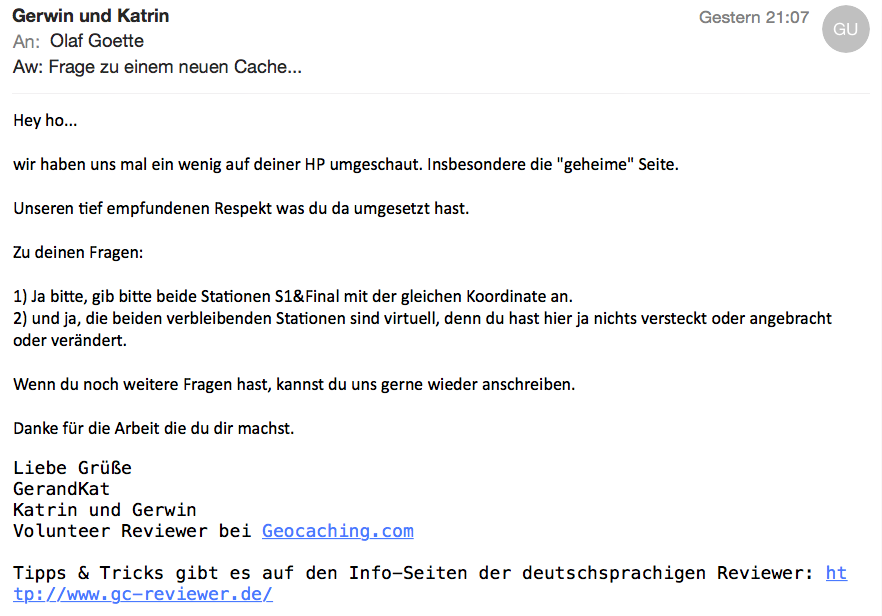
Here’s the translation:
Hey ho,
we just looked a little bit at your home page. Especially we carefully did on the „secret“ page.
Our deepest respect on what you’ve implemented.
Regarding your questions:
1.) Yes, please mention stage 1 and the final as 2 stages with the same coordinates.
2.) and yes, the other stages are virtual ones, because you didn’t placed, added or changed something.
If you would have additional questions, feel free to write us again.
Thanks for the effort, you’re making.
Best Regards
GeradKat
Katrin & Gerwin
Volunteer Reviewer at Geocaching.com
I’m quite proud about what they’re saying regarding what I’ve built already…
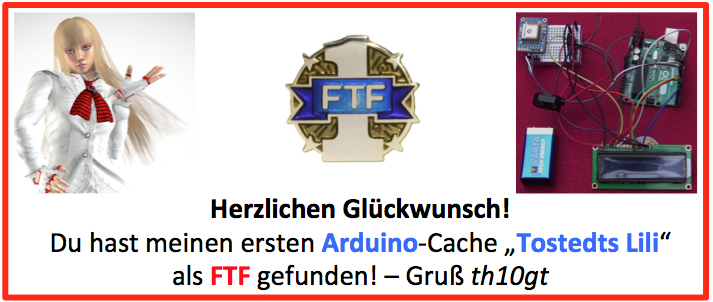
- I also prepared the banner for the cache and even the 3 certificates, I’m usually putting into the cache to honor the FTF, STF ans TTF:

- Last and least (for today) the notice is finished the cacher will leave at the station when he’s underway with the GPS:

The day is ending in a disaster…
Look to topic 2 above. My colleague really did a great job, but not me! When I put all the things together 3 mm were missing in the hight. I wanted to have it finished, so I did it with power. The result: I was able to close the box, but I destroyed the wiring. Arduino is working, but on the tiny breadboard some pins are broken. Due to the fact, I already put a lot of glue to it, its hard to find the mistakes (ore more than one). What to do now? Two options:
- Soldering it again. This might bring the missing millimeters, but I’m quite sure (after two messy results), that I’ll do something wrong again. So there’s a high risk I’ll damage the GPS breakout again, which is quite expensive. Not a real good option.
- Building all up again on a tiny breadboard and using a bigger case for all. This option means that I have to detach the LCD display from the box, where it’s now fixed with a lot of hot glue.
I think the second option is the better one. I just ordered a new box from Amazon.
Unfortunately I have to stay some days in Toulouse / France next week, so I fear the story will go on next weekend earliest...
Weekend: I won’t have much time for my hobby this weekend and unfortunately there’re 3 additional tasks I have to perform during that time:
- I need to „repair“ the „monster station“ of my Cash cache. The battery I bought doesn’t fit into it. So I have to rebuilt the top part of the container containing the antenna and the battery.
- My wife said, that my hobby room in the cellar is looking like a garbage dump. To be honest, she’s right. So after the work on the monster I have to spend some hours (I fear) to bring it back to normal conditions.
- I built the Arduino part in my office and also on the roof-deck, because only there the GPS found the satellites. Unfortunately the „look and feel“ of my office is coming nearer and nearer to the one of my cellar room. So I have also to spend some work on it. A quite uncomfortable discussion is already at the horizon…
What I won’t do: Work on the Arduino part because… Se above.
The only thing keeping me really happy is, that I don’t have to prepare a wedding with 300 guests like you, Tim!
Saturday, 5.9.: I have a new friend!
After I worked in my tiny hobby room in the cellar to repair station 3 of my Cash cache and cleaning that room (as promised to my wife), I got a very nice eMail form you, Tim. Many thanks for that. In the meantime I bought a new container for the Arduino (my bank account is still crying):
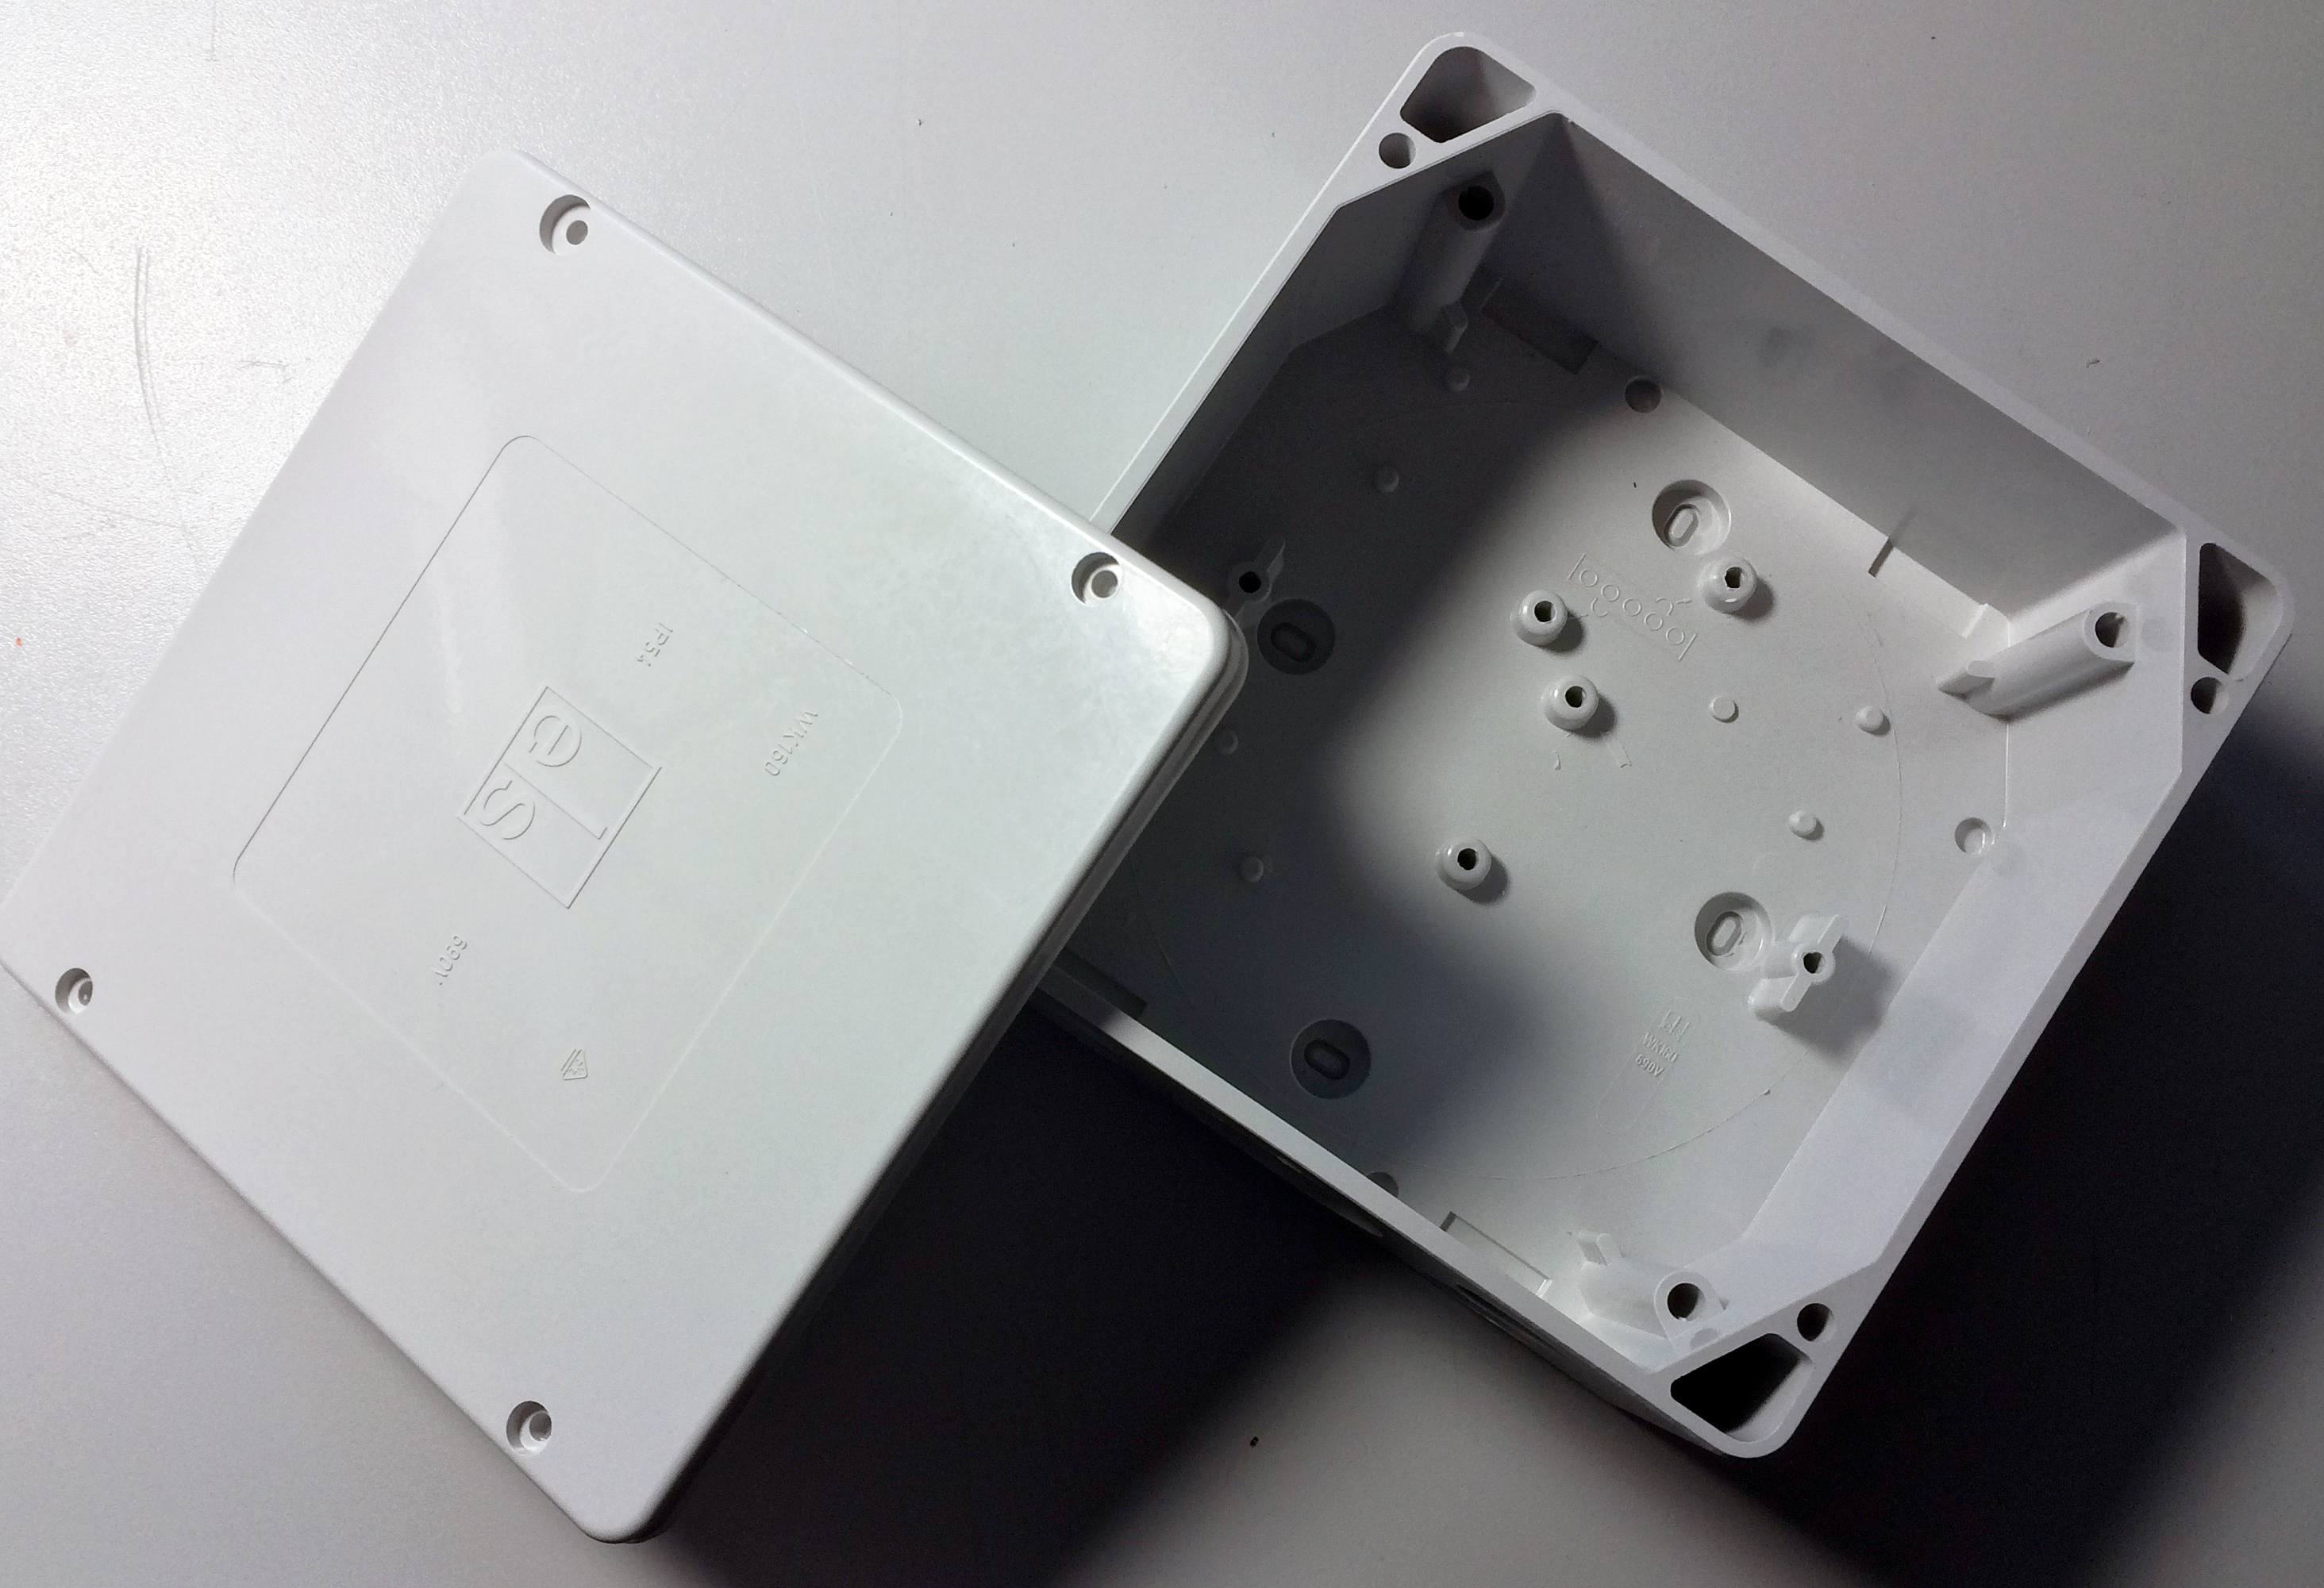
This box is normally for electrical wiring. The size is 165 x 165 x 65 mm, so more than enough space for my project. Hope, I’ll find the time, to work on it tomorrow. Because tomorrow I have to prepare the dinner (not only for us but also for 2 weeks later with my parents in law). I’m preparing „Arroz Chaufa“. Not a receipt you can prepare with the snip of a finger, but very, very delicious. As I said: My 1st hobby is cooking…


Actual staus on the 2nd hobby:
- Station 3 of the Cash cache is 99,5% repaired
- Hobby room in the cellar cleaned up (as promised to my wife)
Sunday, 6.9.2015: Back to status of some days before...
After successfully creating the Arroz Chaufa I worked on the station 3 of the Cash cash. If I wouldn’t have lost some tiny (and - what a surprise - even cheap) parts, I would have completed it successfully. But it doesn’t matter, because there was no chance to place the cache because it was hardly raining all the day.
I reworked the Arduino part. Because everything was glued with hot glue I had to cut all the cables and put some wire between. It looks awful, but the box won’t be clear. Noone except me will have a look to that cabling. After 2 hours everything worked fine and I glued it again.
Unfortunately I have to stay in Toulouse (south of France) on Monday till Tuesday and I’m very bussy the other days. I hope to place everything finally into the box next weekend. I hope my colleague will cut the rectangle for the LCD again out of the new box…
Wednesday, 9.9.2015: Back from sunny and warm Toulouse (south of France)
I’m back from my business trip to Toulouse. Who doesn’t know, I’m working for Airbus, a competitor to Boeing on civil (hmmmm, A400M not really so civil) aircrafts. The weather was nice and warm (26°C compared to 15°C where I’m living.
A very sad log reached me regarding my Lego cache GC5G2P0 (see above):
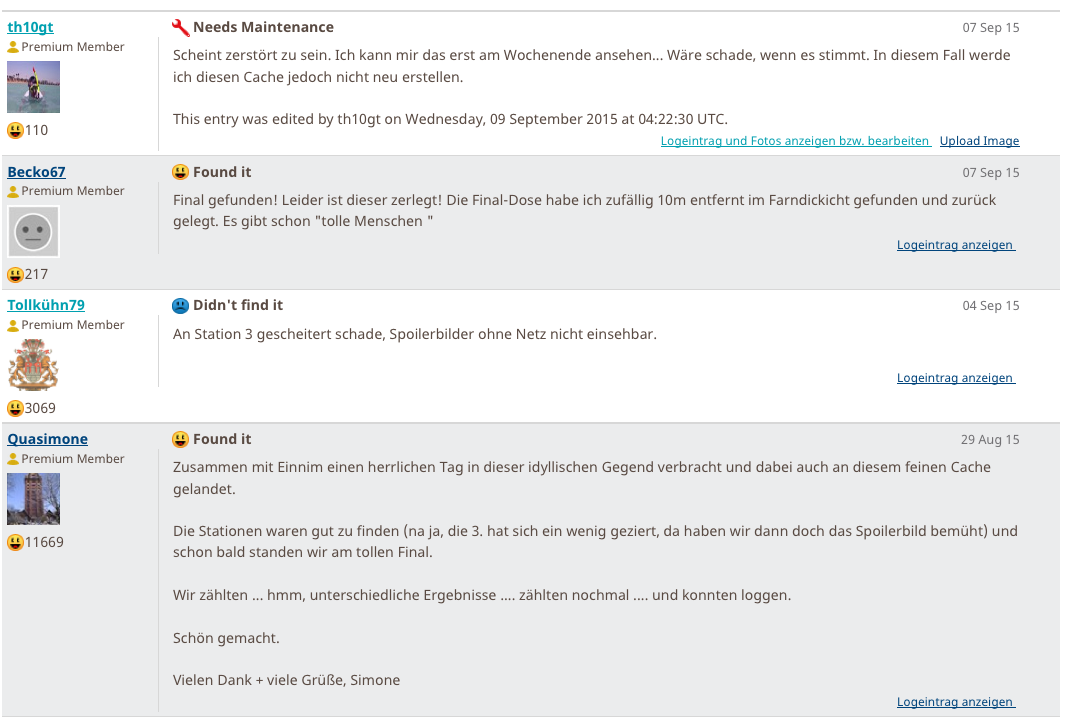
I’m translating from top to down:
me: Seems to be destroyed. I’m able to check not earlier than next weekend. Would be very disappointing, if it’s true. I won’t built this cache again, if true…
Becko67: Final found! But unfortunately destroyed. The log I found 10 m away in the wilderness and put it back. „Great people“ are existing!
tollkühn79: Gave up at station 3. Picture of the spoiler not available without internet in the woods.
Quasimone Together with Einnim we had a great day in this area and also found this lovely cache. We easily fond the statios (k, station 3 was a little bit hard to find and so we used the spoiler picture) and soon we reached the lvely final.
We counted.. hmm different results… and again… and were able to log.
Nice done!
many thanks + kind regards, Simone
Based on this I have some doubts how long it will take ub my Arduino GPS won’t come back int the cache but will disappear to someones own hobby room…
Thursday, 10.9.2015: Arduino boxed...
My colleague did his work and I „boxed“ my Arduino stuff. It’s not 100% finished, because I’ll put a poleax glas from outside over the LCD. After that I’ll polish the box. But it’s looking already quite fine, or???

A big advantage of this (too) big case (which costs me a little bit more than 18€) is, that I’m able to connect an USB cable even when the Arduino is fixed inside the box. The last finish is missing. I hope, I’ll be able to perform it during the weekend and than publishing a new picture here.
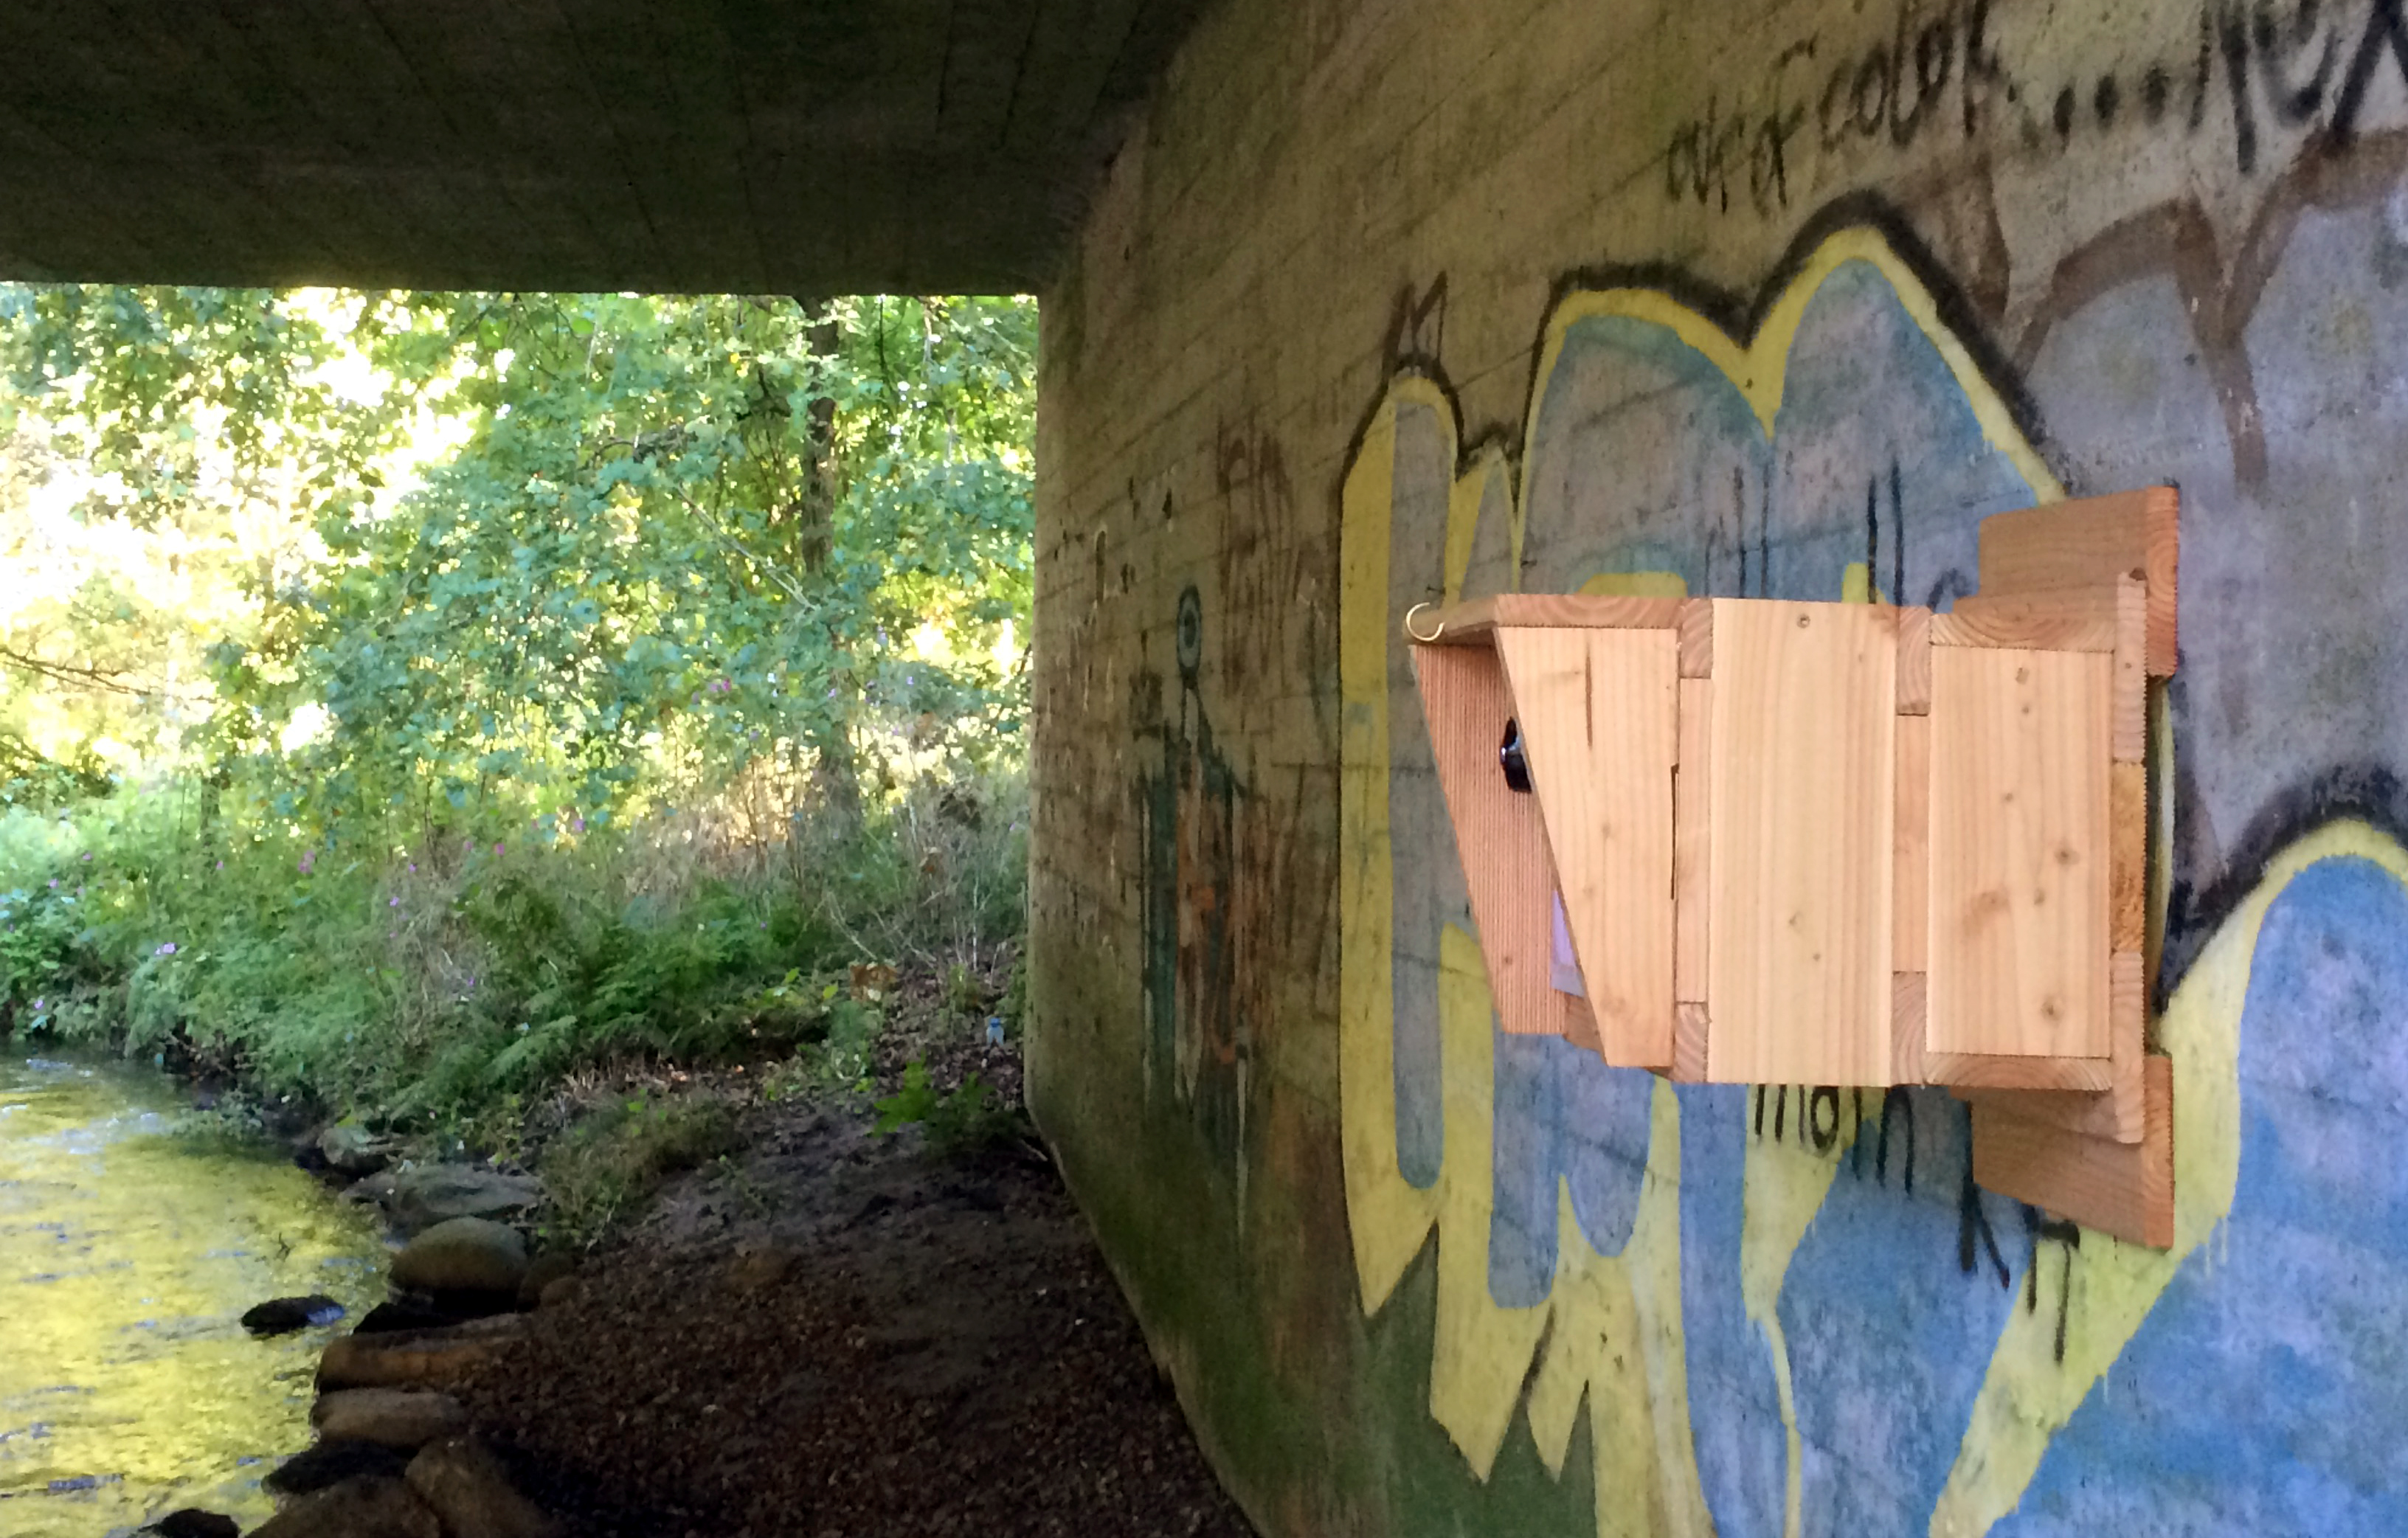
Meanwhile I disvovered the location of the big LiLi stage, where the GPS Arduino will be stored. I wanted to place it under a bridge where in the past another cache was hidden, but archived since more than a half year. But when I checked for biotope protection, I realized, that the bridge is in the middle of such an area. And the former cache should have been placed there.
I found now this place, quite near to our flat (and a lot of my other caches…):

Sunday, 27. and Monday, 28.9.2015: Working on Lili
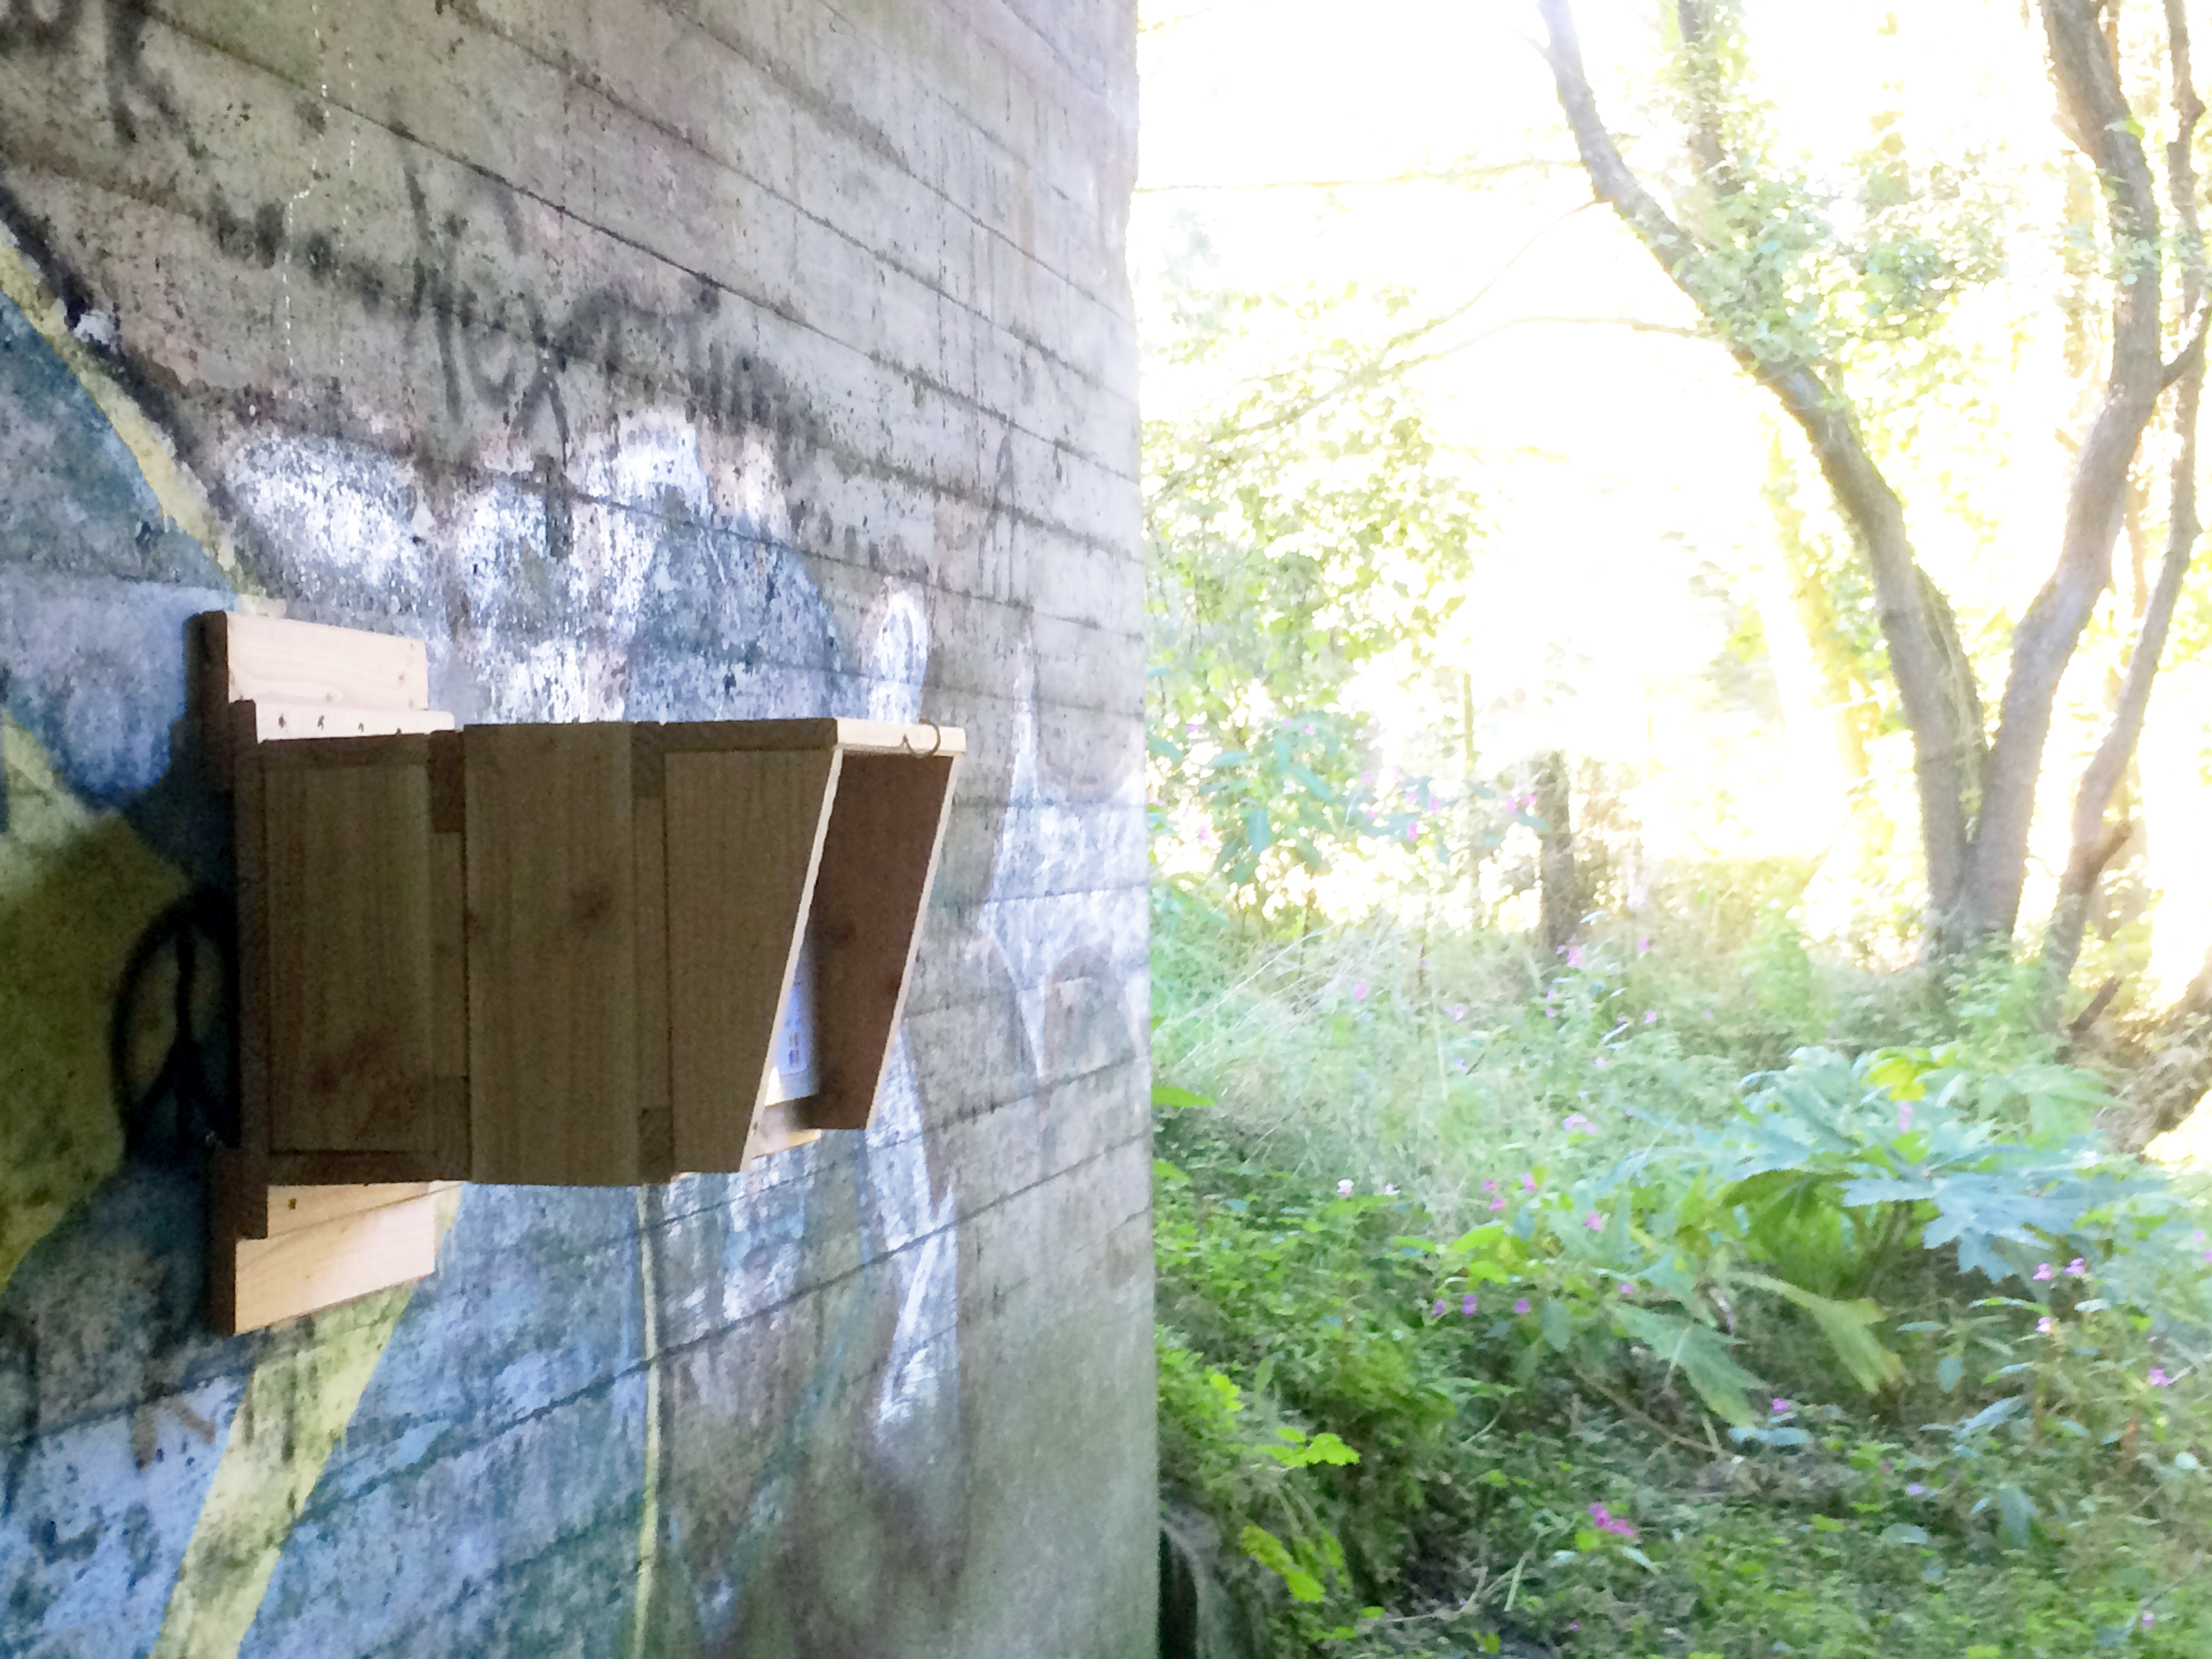
Hmmm, „working on“ would have a different meaning (at least in Germany) too. But that’s not meant here. I checked how to fix the box at the bridge, which is made of ferroconcrete. I tried it with my batterie twist drill, not being a percussion drill. When the hole was less than 2 mm deep, I stopped the exercise. Back at home I met a friend of us. He asked me „Why you’re not cementing it?“ „Hi, have you seen its size and do you imagine its weight?“ „Doesn’t matter! I have a glue which will fix everything!“ This guy is quite reliable and his cement is something for professionals, not offered at building supplies stores. The cement was just in his car. So I drove to the bridge again and fixed two boards (30 x 12 x 2 cm) to the wall of the bridge. In some days I’ll fix Lili (sounds again a little bit like SM) with a lot of screws to the boards.
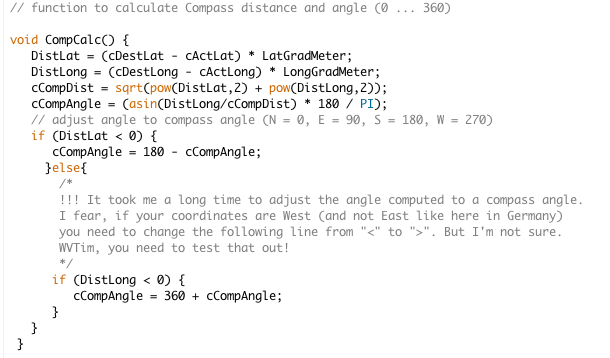
After that I tried the GSM Arduino. It worked very well, but the angle shown to the next station was wrong. I wanted to show something between 0° (=North) and via 90° (=East), 180° (= South), 270° (=West) to 359. Getting a result of -59° was a good proof that there was "some room for improvement“ with my calculation.
Fortunately I was able to skip a meeting at the company this afternoon and spend some time at our roof garden. Now the calculation is ok. For you, Tim, (and for Eric as well!!!) I added a comment, if you want to copy this cache for your area. I fear, that working with „West“ coordinates instead of „East“ like me, you must change a little bit. The complete subroutine to calculate distance and compass angle from two points is only some few line long:
Regarding the GSM fiasco: My colleague agreed to have a look to it. Even when he’s working with a Rasperry Pi and not an Arduino. Let’s see, what he will be able to find out.
I really hope to send the listing to the reviewer this weekend...
Wednesday, 30.9.2015: Working on Lili
Have a look to this short video on YouTube:
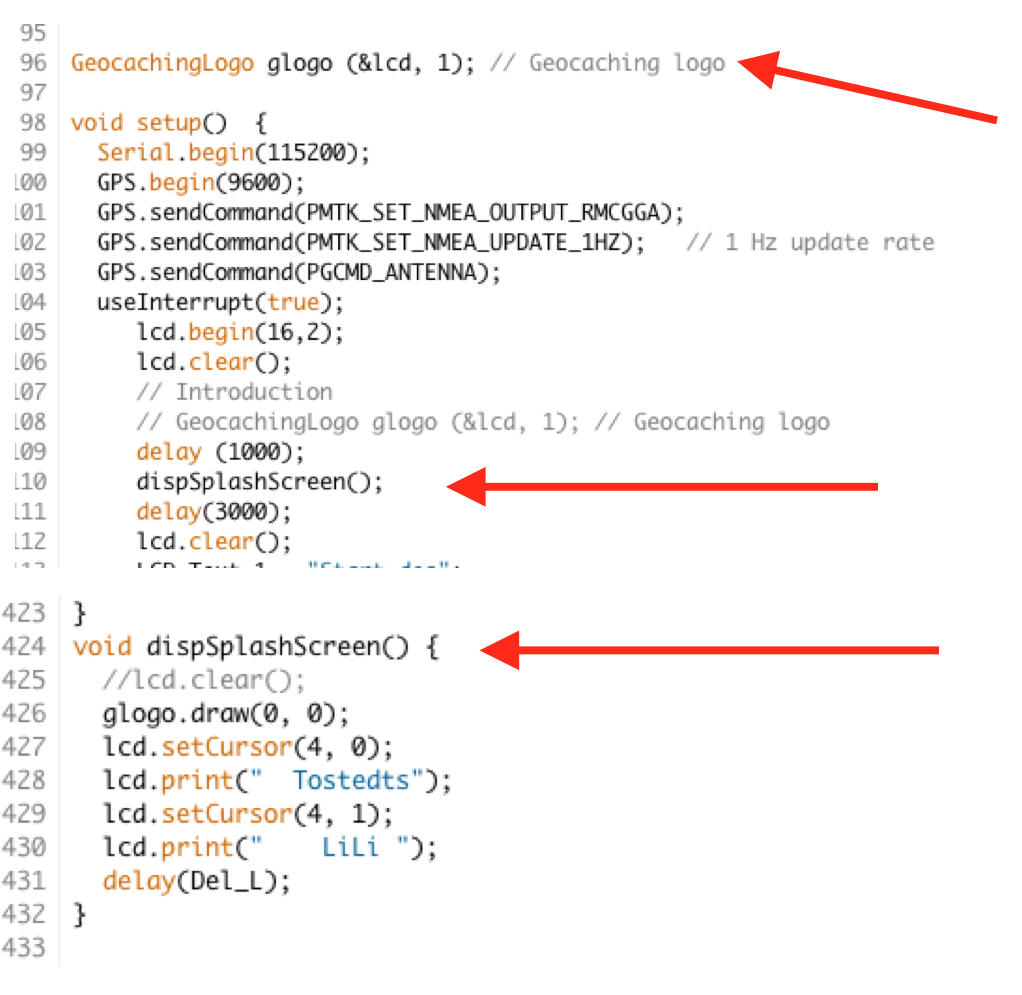
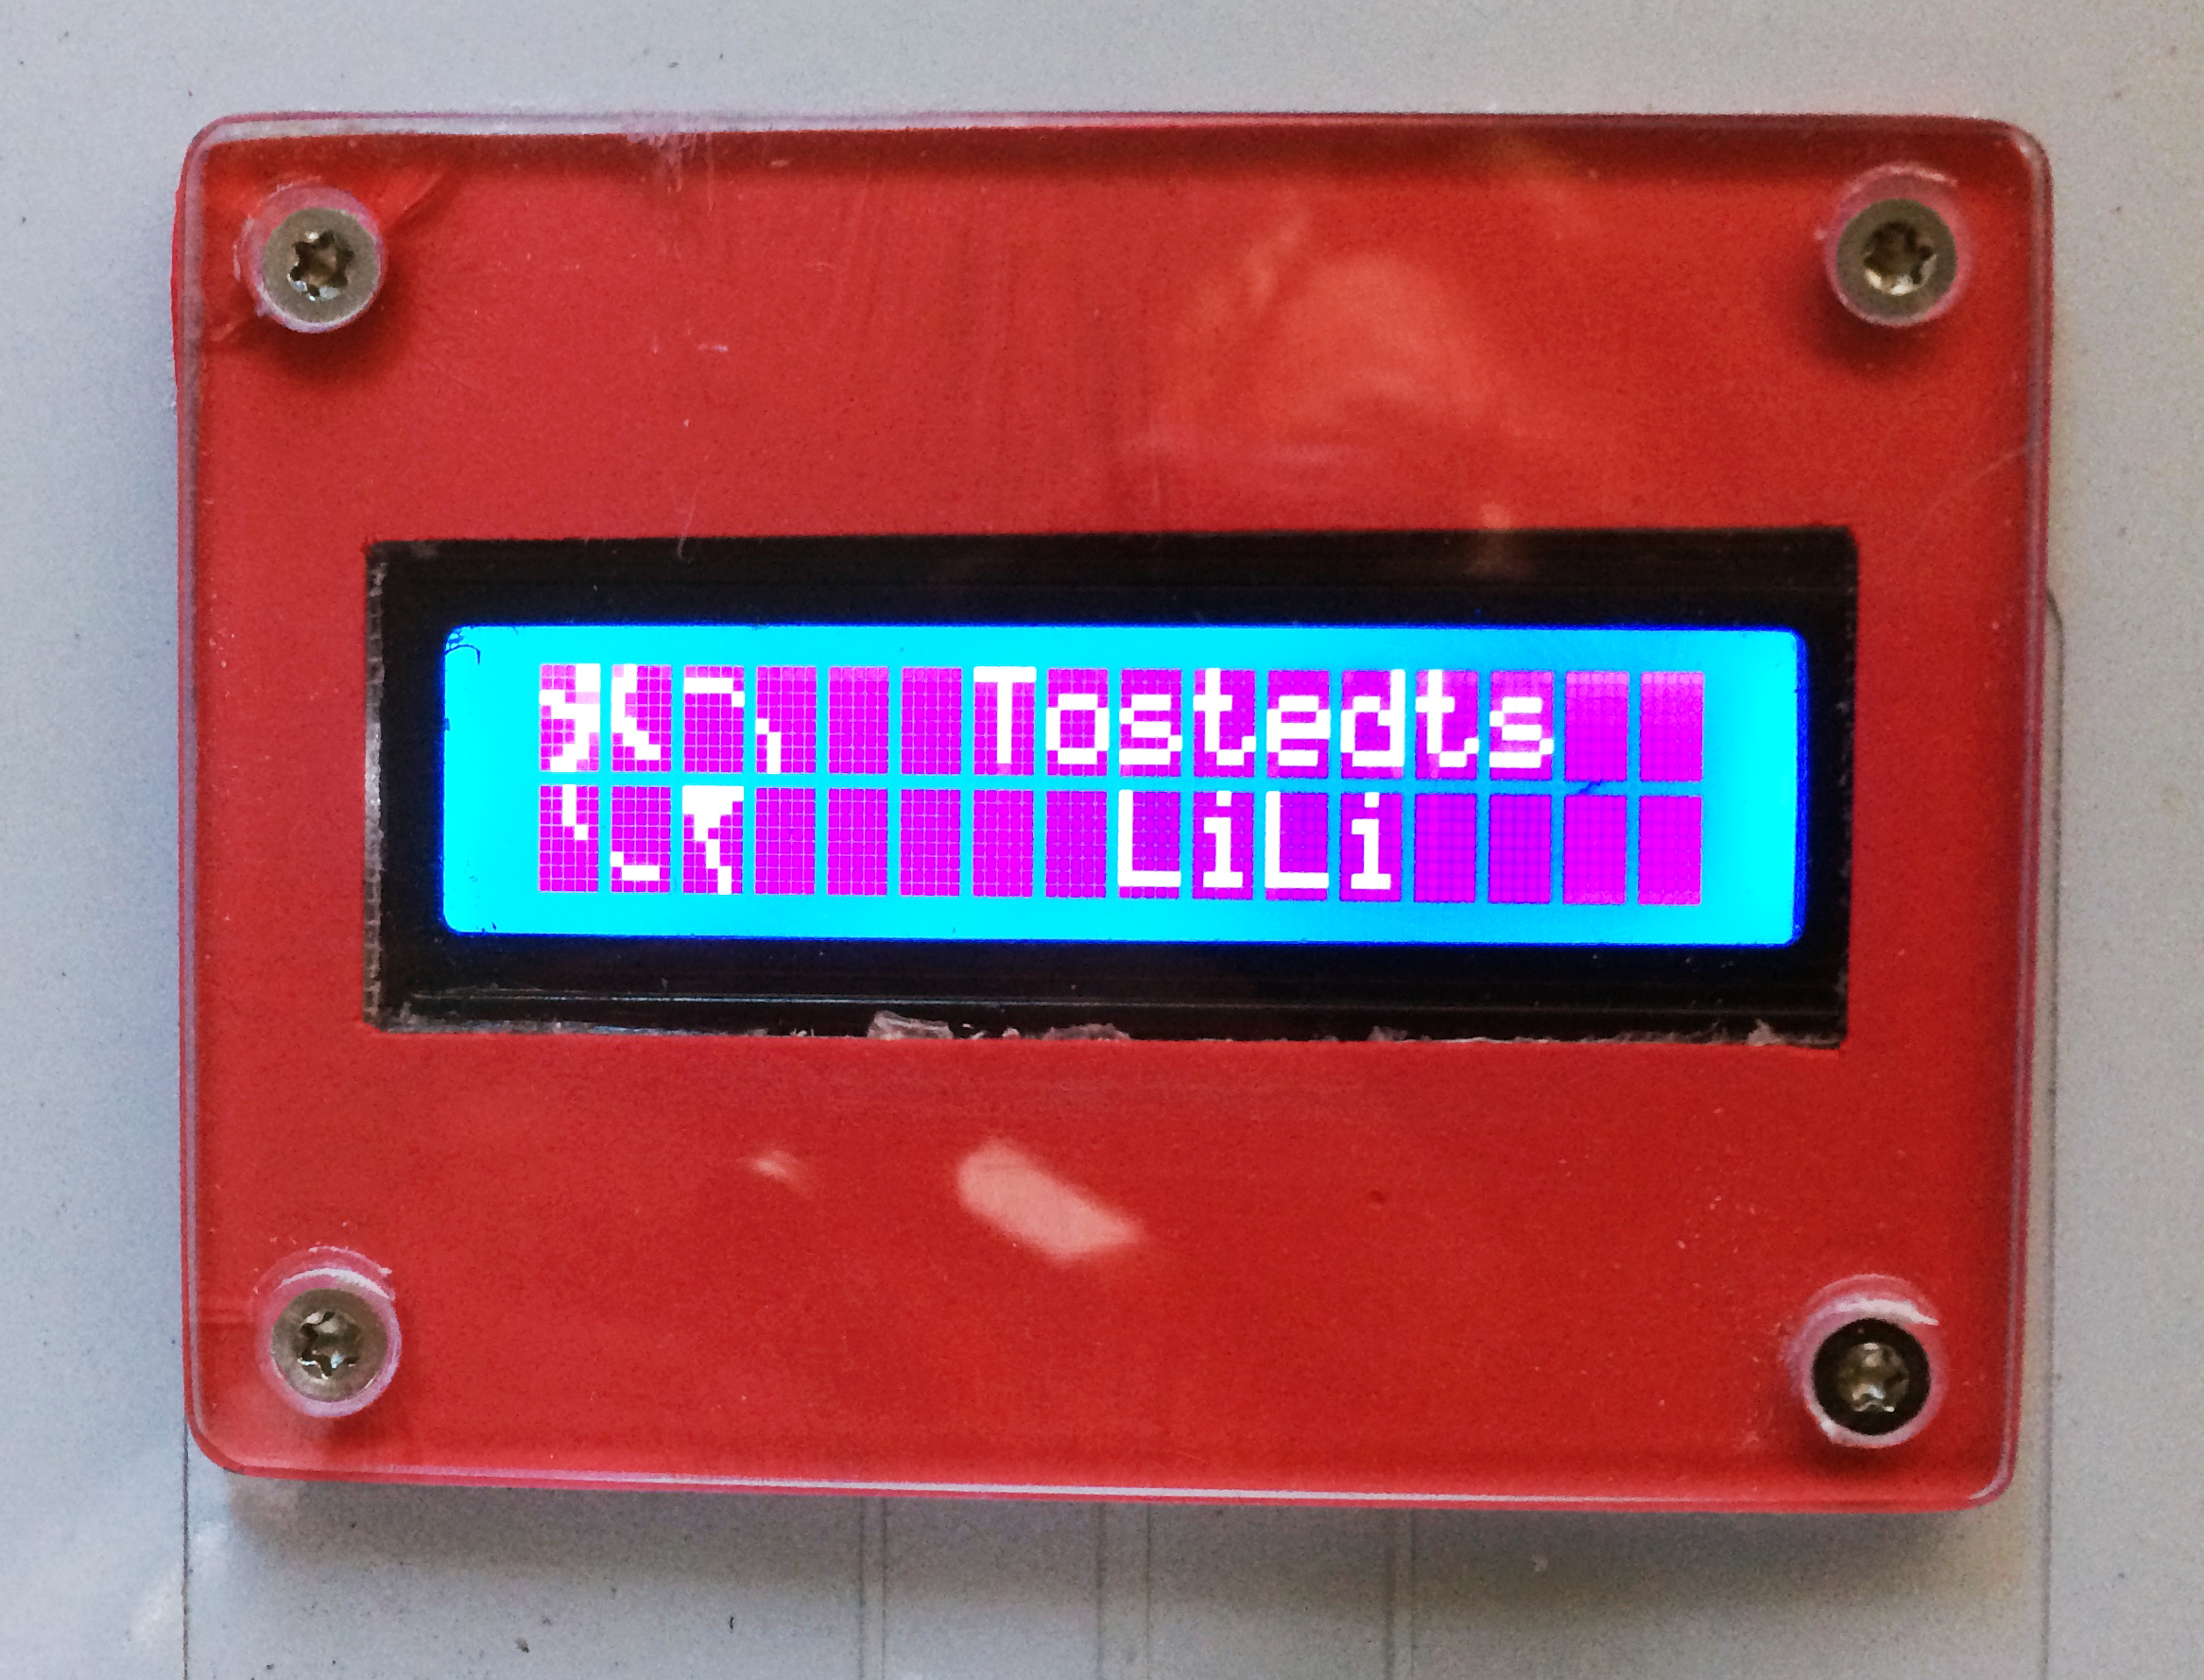
I need to include the Geocaching Logo as shown at the beginning of the clip to my sketch to show it on my Lili cache! That’s a clear must!!! The library to do so you can find at Github. Unfortunately the documentation is quite poor. I’ll test it at home and than I want to place Lili, because th weather is (since the weekend) really wonderfull - even if quite cold (4°C in the morning).
It took some time to understand, how to call the library. Here’re the main parts of the sketch. In addition you need to #include GeocachingLogo.h:
I’m quite proud about the result:
After having this successfully managed, I placed Lili under the bridge and submitted the listing (GC62T1J) for review. Here’re some pictures:
Thursday, 29.102015: New hide needed!
Today I received an eMail from the road maintenance. They controlled the bridge and found the cache. Our eMailing was quite friendly, but it’s not allowed to fix the box to the wall of the bridge. I want to have the box sheltered from rain and so I asked, if it’s allowed to fix the box to a pile. The answer was „yes - but not under the bridge…“ What a shit! I need to find a new location within 2 weeks, they gave me to unmount the box. At the moment I have no idea...
(muggled, not existing anymore…)
Meanwhile this concept was realized by Tim as „Reverse Geocache“ being a part of his SCBC geotlail, published in Juni 2016...