Ethernet shield arrived yesterday and I was quite well prepared with my sketch. You won’t imagine, what was the biggest problem: The LCD wasn’t working well. At the end (after more than 1 hour) I discovered that I’ve forgotten some lines to initialize the LCD. Here’s a first video showing how I’m setting a RTC with the time, I took from the NTP server from Apple (This is the second - final version - taken on 12/24/2016):
As ever: By clicking to YouTube icon you can watch in 1080p
Today (12/3/2016) I’ve finished this little project. The sketch is working (quite) well and I’ve put it (with all the libraries) for download here.
The sketch isn’t pretty well done - a little bit „spaghetti style“. This is mainly due to the fact that I didn’t completely unterstood the libraries. But it’s working...
Some comments are needed if you might copy:
Update 12/23/2016: Some bugfixing done…
I solved the problem with the weekday (e.g. „Friday“) and so I need to update the explanation below….
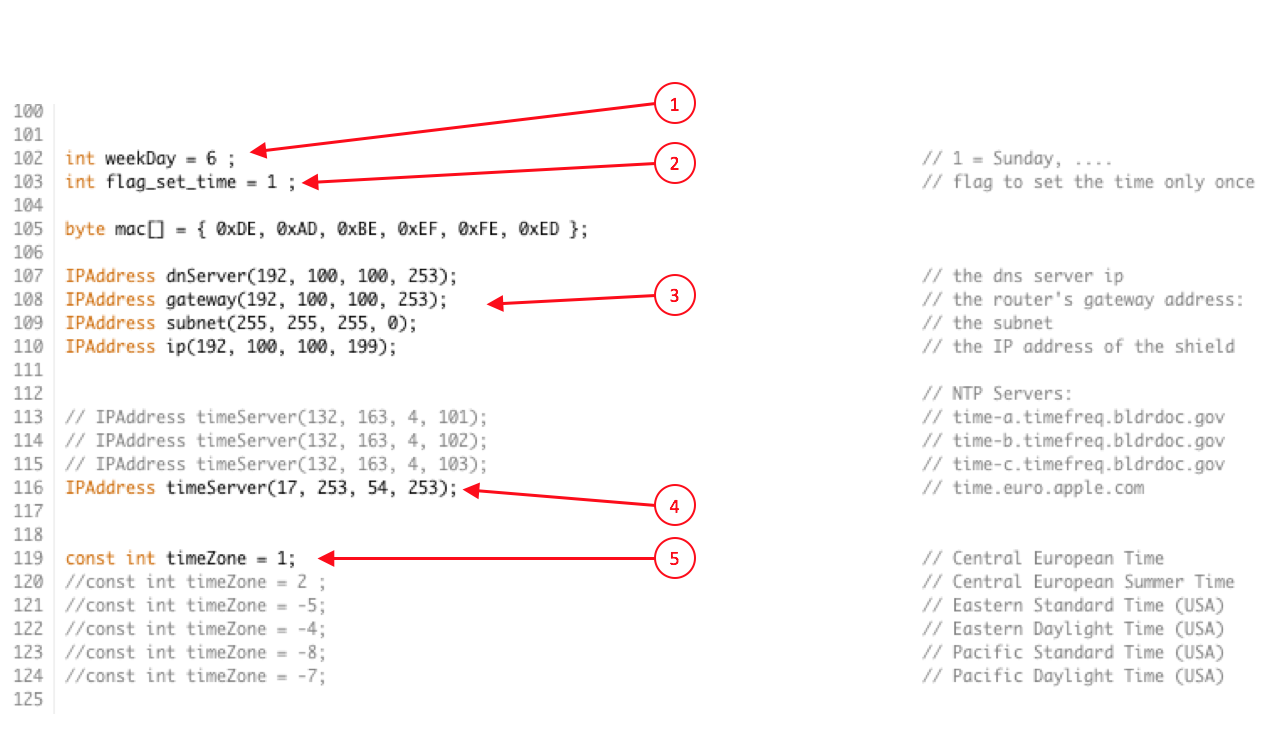
- This variable is no longer needed, because I fixed the problem...
- If you want to set the time, you must put „1“ here, otherwise „0“. This line was moved… See below.
- This are the IP settings of my home LAN. Funny: The IP address of the shield, which is defined in line 110 was overwritten by my DHCP server in my LAN (you can see that in the clip).
- There’re a lot of NTP servers in the web. If you want to use a special one, a nice list of nearly 4,000 servers is here… As an Apple fan, I added the European from them. No need to change that, even when you’re living on the other side of the world.
- Last and least you have to choose your time zone. Some examples are shown inside the sketch. I’ll use for „Time_Stamp“ „1“ for me and „-5“ for Tim.
Again and again: Yes, it would have been much easier and cheaper, to set an RTC by hands (e.g. input via the serial monitor). But this way is not only much more expensive and sexier, it offeres the following advantages for me also:
- If in future I want again to attach an Arduino to the LAN of my home, I won’t start from scratch.
- I learned that I have „dark nieches“ regarding working with three different times: One inside the Arduino itself, the second offered by the RTC and the third from the NTP server.
- At least the second bullit will be a benefit, when working on „Time Stamp“.
What was my fault? Quite easy, after I solved it: I used inside the sketch the internal varialbles of the subroutine to read the time from the NTP. There the variable holding that information is named DayOfWeek(). But the time.h library is using the variable weekday(). So easy, when discovered… But I discovered another crazy topic. When reading the time from the NTP server and writing it into the RTC, I had to substract 48 from the year. I don’t know, why. But it’s working now…
Because there’s a time lag between reading the time from the NTP server and setting the RTC, I added a correction for the seconds. I’m using a correction of 2 seconds and now the RTC is pretty in line with my DCF clock.
In addition I included a LCDCenter() subroutine into Z_LCD. It is working like LCDWrite(), but the text will be shown centered on the display...